
This article was originally published on amigaportal.cz in October 2022. In this version are corrected some inacuracies and paragraph 7.1 GfxBench2D is extended.
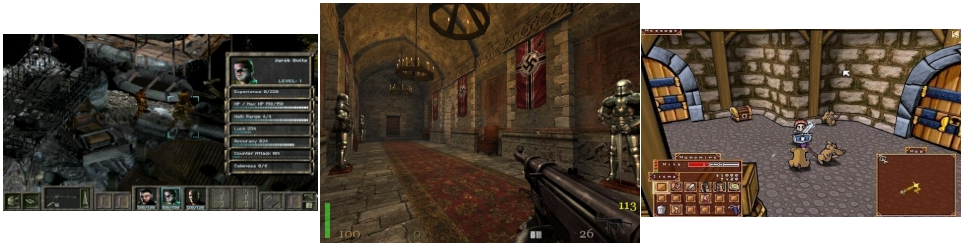
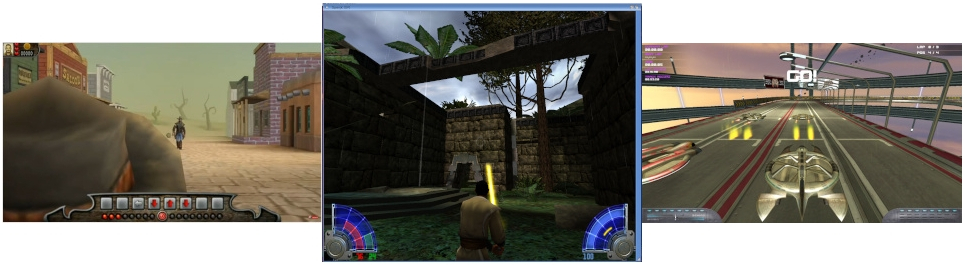
Even though you can play a lot of nice games on the classic AmigaOS 4.1 FE, I would like to try the AmigaOne XE with modern PCIe cards, just like I did with Sam440ep-flex back in the day. Because then we can also run games that require more modern APIs.
In this article you will also come across such a curious place called Alchemist's Corner. Feel free to skip them, they are only relevant for demonstrating the ability of AmigaOne XE with U-Boot 1.1.1 to confuse any tester and make their job harder.
1. What cards we will test
With AmigaOne XE we can use cards for three different buses: PCI, AGP and PCIe.
PCI graphics cards I used to debug PCIe graphics cards, but we won't test the speed. All supported PCI cards are less powerful than AGP.
AGP cards work natively in the AGP slot, the fastest fully supported by AmigaOS 4.1 FE is the Radeon 9000 PRO with the RV250 chip. For these cards we can use classic AmigaOS libraries like Warp3D and MiniGL.
Theoretically, faster cards of the same generation Radeon 8500 or Fire GL 8800 with R200 chip should also work in AmigaOS. They do work, but they cause graphical artifacts that make them unusable.
The fastest AGP card we can plug into XE is the newer generation Radeon 9800 PRO ( R350 chip ), but the drivers only support SDL in hardware, so we won't try it either.
PCIe cards Radeon Southern Islands ( HD7xxx, R7 xxx, R9 xxx) allow the use of the modern Warp3D Nova and Ogles2 drivers (part of A-Eon's Enhancer software package). These cards are several times more powerful and there are many modern games and applications for them. How about playing HunoPPC's new Doom3 (Dhewm3) on the XE ?
2. At first a bit of theory again
This time just briefly ( everything is in detail in the article about Sam, "Graphics cards for Sam440ep-flex", here on intuitionbase.com.
2.1 Graphical Drivers
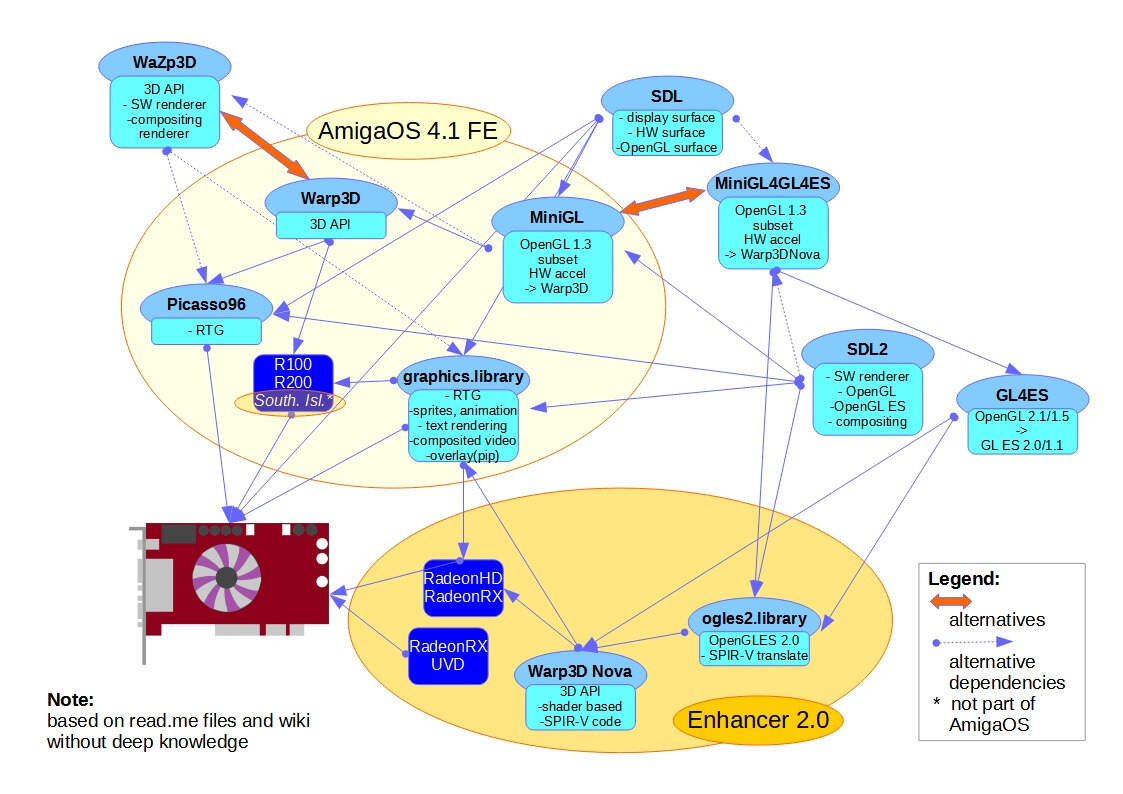
Warp3D and MiniGL: 3D drivers in AmigaOS 4.1 FE
Warp3DNova and Ogles2: new 3D API for modern cards
GL4ES: OpenGL 2.x/1.5, GL ES 2.0/1.1 and limited OpenGL3.x. Transition library, widely supported on devices such as Pandora, ODroid, OrangePI, CHIP, Raspberry PI, Android, allows easy porting of new software.
MiniGL4GL4ES: an important component for modern cards, it is a MiniGL API the same as the classic one, but it redirects calculations to Warp3DNova, so even PCIe cards can run MiniGL applications. It's just a quick wrapper, it doesn't allow running multiple MiniGL applications at once for example, but it's useful.
2.2 What PCI bus looks like in AmigaOne XE
The PCI bus in the AmigaOne XE is controlled by the northbridge, so let's take a closer look at it.
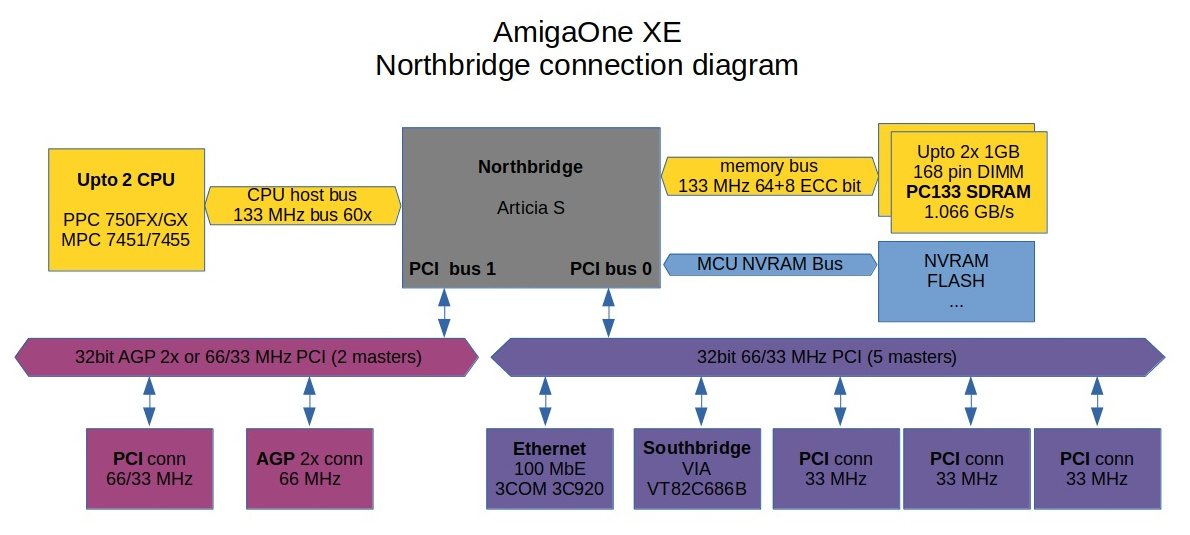
This is a simple diagram of the northbridge Articia S from Mai Logic in AmigaOne XE. Apart from the fact that it can connect up to two PPC processors ( possibly also MIPS or x86 ) and has support for 2x 1 GB RAM we are interested in the fact that it is an arbiter for two PCI buses:
PCI bus 0 features:
- 32-bit, 66/33 MHz PCI interface.
- 3.3 V I/O (5 V tolerance).
- arbiter for 5 external PCI devices, optimized for PCI performance.
The AmigaOne has a southbridge and a 100 MbE NIC connected internally to this controller, as well as three PCI expansion slots.
PCI bus 1 features:
- interface can be configured for 32-bit AGP or 32-bit 66/33 MHz PCI modes.
- AGP mode supports sideband addressing, AGP x1 or x2 speeds, and GART.
- PCI mode has an arbiter for 2 external PCI devices.
There is nothing connected internally on this controller, but there are two expansion slots: an AGP and a PCI.
From this we can theoretically deduce a few little things:
- The three PCI bus 0 slots can only be used in 33 MHz mode, as the bus already contains 33 MHz devices ( NIC and southbridge ).
- two devices can theoretically be operated simultaneously on PCI bus 1 in PCI mode.
- In PCI bus 1 in the AGP slot we can only use 3.3 V compatible cards, i.e. those that can do AGP x1 or AGP x2 ( those that have connector with two notches, or with one notch close to backplate ). While it is possible to physically put newer AGP cards that are only x4 and x8 ( they have a notch far from backplate ) into the AGP slot, don't do it. They are at 1.5 or 0.8 V and might not survive.
- In all PCI slots you can use only 5V cards ( notch far from backplate ) or universal 5V/3.3V ( two notches ). Articia S could also handle pure 3.3V cards, but the PCI bus on the motherboard is only 5V and not 3.3V.
3. What we will need to use PCIe card
While of course for PCI or AGP cards we already have everything on the motherboard, for PCIe cards we will again need to prepare a few things.
3.1 PCI-to-PCIe bridge
So first of all we will need a PCI-PCIe bridge again. And once again it turns out that the recommended PEX 8111/8112 with optimized HW driver does not work, but only the transparent one - in my case with the P17C9X chip.
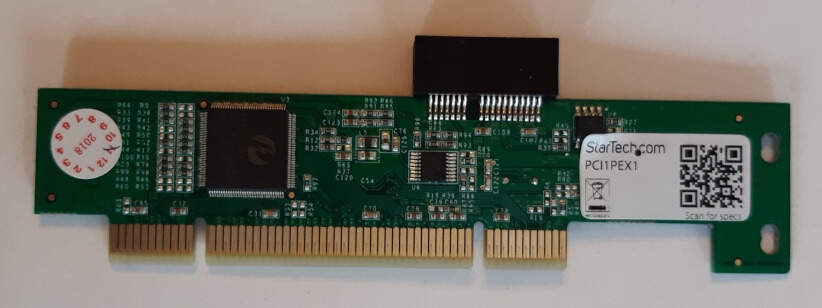
As we already know, using any PCI-PCIe bridge will slow down the transfer on the bus and increase latency - the chip must transform parallel 32-bit PCI traffic to 1-bit serial for PCIe.
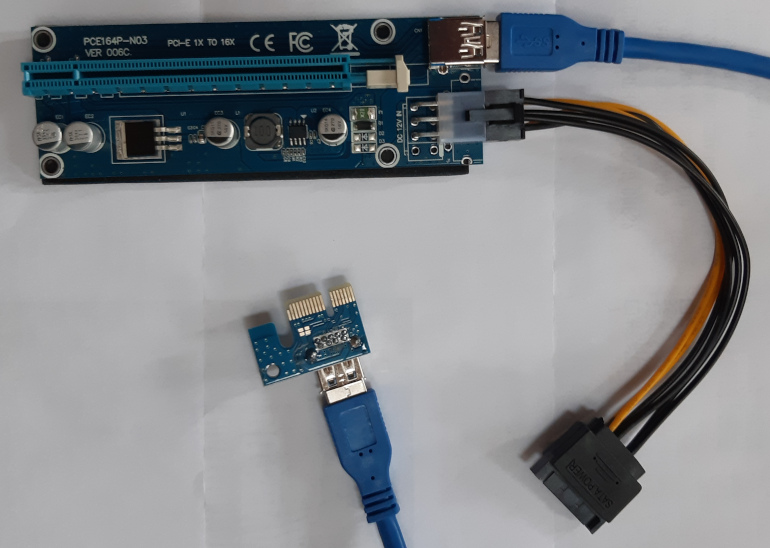
And we also need a PCIe x1 - PCIe x16 riser, mainly for power. Our PCI bus only puts out 25 W and can't handle PCIe cards, which can draw up to 75 W. Fortunately, there is no additional slowdown here, it is a pure serial line ( more precisely two serial lines, with PCIe the lines are always in pairs - one for Rx, the other for Tx ).
3.2 drivers
We need to pre-install the PCIe HD card driver - RadeonHD.chip ( by Hans de Ruyter ) into AmigaOS.
And we should also have Warp3DNova and ogles2.library for game testing, all is included in Enhancer package.
I should mention here that OOTB works best on AmizeOne XE Enhancer 1.5, containing RadeonHD.chip v.2.22. Some other games ( like ioquake3 ) don't work with newer versions of Enhancer 2.0 and 2.2.
3.3 others
For the initial commissioning of the PCIe card it is necessary to enable debugging via serial link ( set os4_cmdline to: debuglevel=7 serial ) and connect the cable to another Amiga with a Term terminal, or to a PC with TeraTerm.
And as I mentioned in the previous article, it is advisable to disable all unnecessary devices in U-Boot, especially USB.
Also useful is the SYS:Utilities/Ranger program, which we will use to browse the PCI bus.
After the PCIe card is commissioned, for speed testing set debuglevel=0 again.
3.4 U-Boot firmware
In order to use a graphics card in a PCI slot we must first set up U-Boot. Specifically the AGP / PCI controller configuration and also the video output.
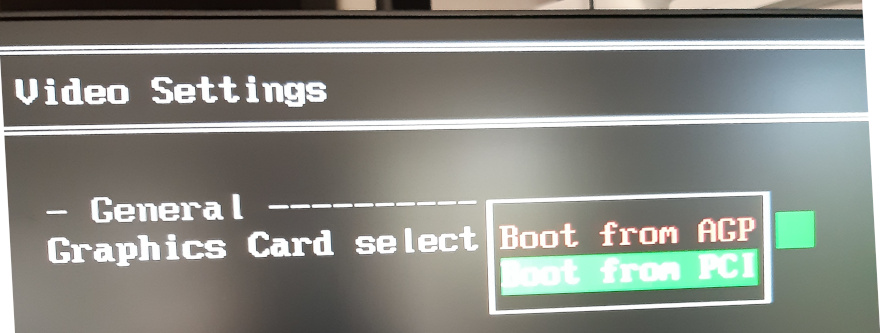
In the "Video settings" menu we can set which card the video output will come from when booting, we have the options "Boot from AGP" or "Boot from PCI".
This menu has to be set up if you use two graphics cards, and as I wrote in the first article, it's kind of weird and sometimes a little confusing.
"Boot from AGP" - usually means that the video output during boot will come from a graphics card connected to AGP or PCI 66 MHz - i.e. PCI bus 1.
"Boot from PCI" - usually means that the video output during boot will come from a graphics card connected to the PCI 0 bus, i.e. PCI 33 MHz.
But this only works if you connect both cards to the VGA cable.
If you try to plug two graphics cards into the AGP and PCI 66 MHz slots at the same time, both on PCI bus 1 ( in PCI mode! ), you are out of luck. U-boot can't and won't recognize either one.
And a small digression - we will see how many graphics cards U-Boot actually found in serialdebug:
Two cards:
VGA: 0 ...
1 ..
One card:
VGA: 0 ...
No card:
VGA: NOT PRESENT
or
VGA: and blinking cursor
If we only have one video card ( or U-Boot only recognizes one ), the video output usually goes through it regardless of the "Video settings". Or it doesn't go at all.
Also important is the fact that it is only a video output on boot. AmigaOS then sets the output according to itself, i.e. according to the data in SYS:Prefs/Monitors and Screenmode. I would just add that if you have only one monitor in DEVS:Monitors, AmigaOS sees only one card, the same as U-boot. If you also have another PCIGraphics monitor ( see Hans' tutorial on two graphics cards in AOS ), you can select where the Workbench will be displayed in Screenmode.
Alchemist's Corner 1:
Here again, in fact, knowledge of alchemy is needed. The intention of the authors of U-Boot is obvious, but unfortunately, it did not quite work out as in these cases:
With setting "Boot from PCI"
and AGP slot card configuration: AGPgfx+VGA Cable, PCI 33 slot: PCIgfx+DVI cable
U-Boot screen outpus is on AGP card.
If we then set "Boot from AGP"
and switch the cables to the cards: AGP slot: AGPgfx+DVI cable, PCI 33 slot: PCIgfx+VGA cable,
we're happily booting from the PCI card. Beautiful, isn't it?
And there are more such situations when U-Boot uses the opposite card than it is set to. So if we have two cards, we have to sacrifice some time to try the "Video settings".
The "PCI/AGP" menu is much more important and fortunately unambiguous. We can set two things here.
The first is the "IRQ level" for PCI interrupts. We won't deal with that now, it will probably be in the next article.
The second, more important part for us is the "AGP bridge".
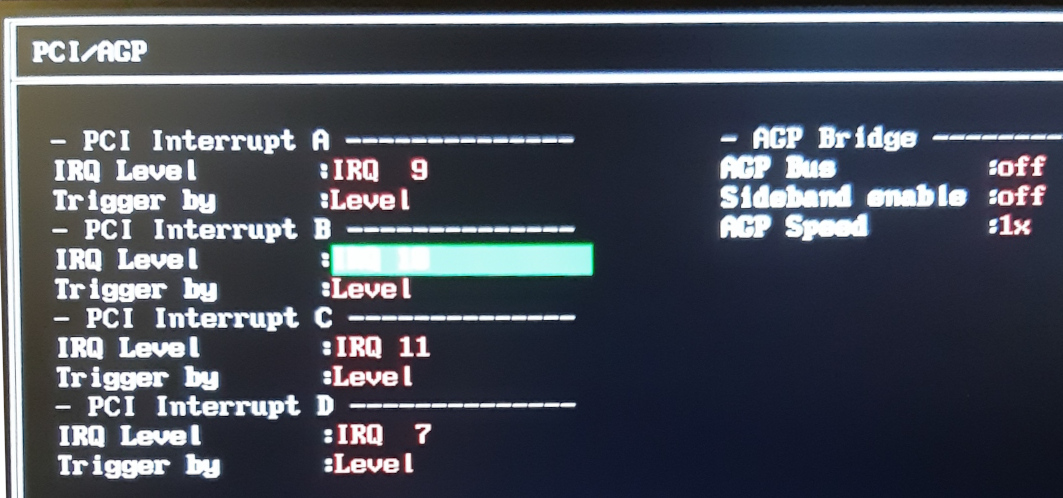
"AGP Bus" - "on" means AGP mode, we can use only one card and it is AGP. AGP is not really a bus, but a dedicated point-to-point connection of a single card to the controller.
"AGP Bus" - "off" means PCI mode, we can use both connectors, i.e. AGP card ( in PCI mode ) or PCI 66 MHz card.
This is REALLY NECESSARY to set AGP Bus to "off" if we have a graphics ( or any other ) card in the PCI 66 MHz slot, otherwise the card may be destroyed. Fortunately the PCI card I thought I destroyed last time in AGP mode is alive. It just overheated and needed a rest.
"Sideband enable" - if we are in AGP mode, we use sideband addressing acceleration.
"AGP Speed" - "1x" or "2x" needs no explanation. Again only for AGP mode.
3.5 A little offtopic - multiple different system configurations
( It's totally not about testing cards. If you want, skip this chapter. )
When testing graphics cards running on different buses, you can't do without trying different drivers. Sometimes it's hard to get the system back to its original state, because of course you forget what you changed and you don't make a backup before each step. When I was installing clean system from scratch for about the third time, I made more configurations of the system.
I wanted these boot configurations:
- pure AmigaOS 4.1 fe, updated
- AmigaOS 4.1 fe, updated + Enhancer 1.5
- AmigaOS 4.1 fe, updated + Enhancer 2.0
- AmigaOS 4.1 fe, updated + Enhancer 2.2
On AmigaOne XE this is much more laborious than on X1000 or Pegasos 2, but it is possible. It is laborious because of the first-level and second-level bootloader properties (slb_v2).
First-level bootloader ( it is part of U-boot ) works in such a way that it sequentially scans the boot devices in the order you have entered them in "Amiga multiboot options" ( e.g. order of IDE DVD, IDE HDD, ... ) and stops at the first one it finds and does not scan other devices in the order ( e.g. PCI IDE or PCI SATA ).
If it doesn't just use the magic "No SLB found" message, it will load slb_v2 ( which is written to the HDD when the system is installed ) from the disk and run it.
SLB is looking for the boot kernel on the disk it booted from ( more precisely, the partition with the boot flag set, the highest boot priority and the Kickstart/ kernel modules directory ). It also does not look at other disks anymore.
If in our case ( IDE HDD ) you have multiple system partitions on the disk, you are out of luck. SLB will take the one with the highest priority or the first one if they have the same priority and boot from it. It won't give you a choice. We have to do it differently. Just put all the kernels on one boot partition.
As you know from the last article, I have a CF card with kernel modules already on the IDE bus. Originally this was out of necessity, as my Amiga refuses to boot directly from the SATA card, but now we will take advantage of it.
On CF I have a single FFS partition BootCF: and in it four directories for four different kernels, corresponding to the system configurations above:
/Kickstart
/KickstartE15
/KickstartE20
/KickstartE22
Then four system disks on the SATA disk, again by analogy:
DH0: System:
DH0E15: SystemE15:
DH0E20: SystemE20:
DH0E22: SystemE22:
The next procedure is to install from CD to DH0: AmigaOS 4.1 fe, do all updates and settings ( and NetFS! ) and remember to copy the directory System:Kickstart/ to the CF card BootCF:Kickstart/
In the other /Kickstart* and System*: we also will copy the same thing as a base on which we will then install different versions of Enhancer.
For copying ( and also for backups ) I prefer to use the program BackUp ( by Daniel Westerberg, Onyxsoft.se ). It is 68k for AmigaOS 2.x, but it is one of the few that can correctly copy symbolic links. It has a GUI and also can be used from the shell.
Next, you need to add the "BootDevice" files containing the names of the disks you want to boot from to all /Kickstart* directories as follows:
Code:
echo DH0 > BootCF:Kickstart/BootDevice
...
echo DH0E22 > BootCF:KickstartE22/BootDevice
Then we need to add the line "MODULE Kickstart/BootDevice" to the end of each of the four /Kickstart*/Kicklayout files.
This will ensure that when the kernel is loaded, it will boot from the disk written in the BootDevice file, regardless of the boot priorities set.
Then comes the hard part:
Since slb_v2 can only load one kernel configuration from the /Kickstart/Kicklayout file (the Kicklayout file contains the names of the modules to be loaded), we need to write all the kernel module variants we want to use into this first Kicklayout.
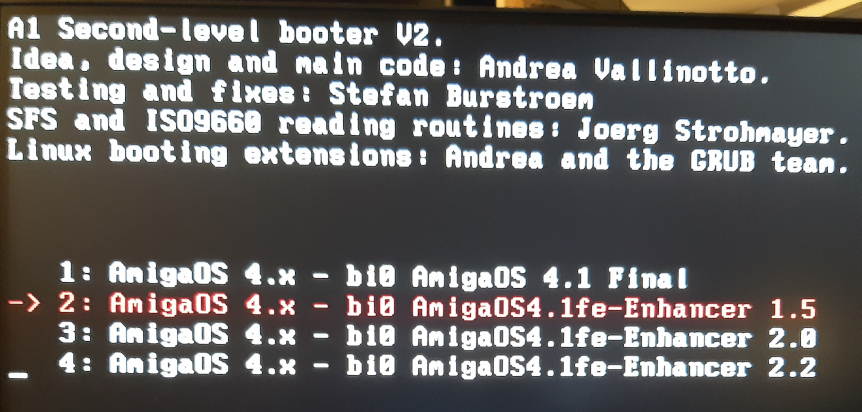
Let's start by changing the "LABEL ..." line in this primary Kicklayout to unique name, in my case "LABEL AmigaOS 4.1 Final"
Then we append to this file ( for example with the join command ) the file /KickstartE15/Kicklayout, change the line in the appropriate section to "LABEL AmigaOS4.1fe - Enhancer 1.5" and then change all the following lines with the modules "MODULE/Kickstart/..." to "MODULE/KickstartE15/...".
And again the same for KickstartE20 and KickstartE22. So we get one long /Kickstart/Kicklayout with four kernel and boot disk configurations.
I confess that the first time I edited it all manually, but then after installing Enhancers ( and thus making other small changes to individual kernels ) I wrote a script that uses the text stream editor "sed" to make the appropriate changes to the MODULE/Kickstart -> MODULE/KickstartExx text and then merges the files.
Ugh. Awful, isn't it? But it's worth it. And it's also worth backing up those four clean installs. And it has the advantage that in the U-Boot preferences you can select the configuration you want to boot from primarily ( the red one in the picture ), so you don't have to keep lurking at the monitor to avoid missing the boot selection.
4. PCIe graphics card with PCI-to-PCIe bridge in PCI 66 MHz slot
Now that we have all that, we can finally go to rehearsal. We'll check again that we have the "AGP Bus" in the U-Boot set to "off" and plug the PCI-PCIe bridge and the HD7xxx card into the PCI 66 MHz slot.
Subsequently, we find that the card does not work in PCI 66 MHz. U-Boot does not appear, the boot sequence is automatically executed and ends with a message on serialdebug:
Code:
Booting configuration AmigaOS 4.1 Final
graphics.library AltiVec/VMX enabled
graphics.library PPC74xx optimizations enabled
graphics.library cannot configure your graphics board!
Either your board is not supported or there's a configuration problem.
Did you install PCIGraphics.kmod?
And yes, I've tried all possible bridge types and all versions of PCIGraphics.card ( not .kmod ) that are available.
When I tried it later with a second PCI graphics card in a PCI 33 MHz slot it was clear why this was the case:
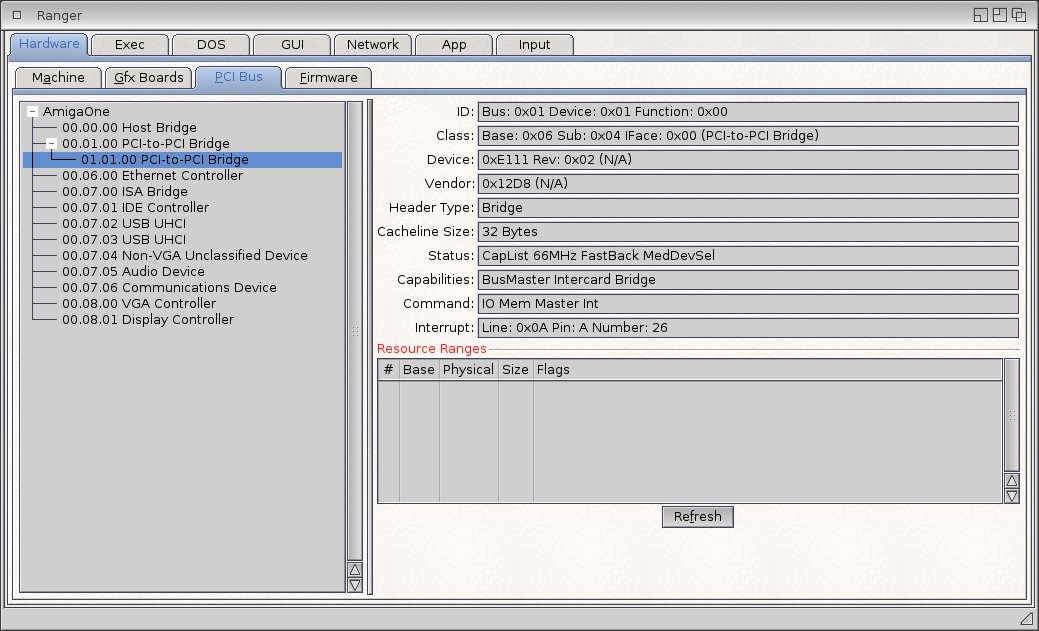
The blue selected part 01.01.00 is the PCI-PCIe bridge itself. That is all the system can see. No VGA controller behind it. Unfortunately, and this fact is confirmed on the forum by Hans, U-Boot cannot initialize the graphics card behind the bridge on PCI bus 1 ( 66 MHz ). Further on in the picture at address 00.08.00 is a Radeon 9250 PCI card in a 33 MHz slot from which Workbench runs.
5. PCIe graphics card with PCI-to-PCIe bridge in PCI 33 MHz slot
First of all, if you have an AmigaOne XE with DMA-fix, you probably won't be able to connect a PCIe graphics card even to a PCI 33 MHz slot.
DMA-fix causes other undocumented side effects. In order to be able to connect a graphics card to PCI with the DMA-fixed Amiga at all, you need to disable USB, disable DMA for IDE ( even if you did DMA-fix for this reason ) and sometimes also the internal network NIC. And even then you can only get the card to work rarely. So a DMA-unfix is a must. This is also the reason why you can't connect an external graphics card to the Micro A1-C - the Micro has a DMA-fix from the factory.
My Amiga is now DMA-unfixed, so we can test happily.
And as usual, a little alchemy with the slots:
Alchemist's Corner No.2:
When we put a PCIe graphics card in a PCI 33 slot and the other slots are not occupied at all, U-Boot works fine, but the system reports again:
Either your board is not supported or there's a configuration problem.
Did you install PCIGraphics.kmod?
And yes, both Radeon.chip and PCIGraphics.chip are where they should be.
However, if we add any PCI card in either the 33 or 66 MHz slot, the PCIe graphics card works. I guess the poor card is afraid to be alone. After all it is made for modern PCIe computers and now they are forcing it to go into such a historic motherboard alone.
So not technique, but alchemy again. You must not get discouraged and combine and try different slots and variations.
And as it turned out, the type recommended by PEX 8111/8112 for which the HW driver is optimized did not work again. U-boot was displayed and booted fine, the system booted according to the log, even RadeonHD recognized the card and booted it successfully ( according only to itself ).
Code:
graphics.library AltiVec/VMX enabled
graphics.library PPC74xx optimizations enabled
RadeonHD.card (0): RadeonHD.chip 2.22 (25.3.2017)
RadeonHD (2): Graphics card name is: Radeon HD 7700 Series
RadeonHD (2): identified the chipset as: VERDE
....
RadeonHD.chip (0): Connector[2] DVI-I 1:
RadeonHD.chip (0): Type: RHD_CONNECTOR_DVI
RadeonHD.chip (0): DDC bus: RHD I2C line 3
RadeonHD.chip (0): HPD: RHD_HPD_1 (monitor connected)
....
RadeonHD.chip (0): RadeonHD card successfully opened
But unfortunately I couldn't share the graphic driver's beliefs - all I could see was a black screen.
So it was necessary to use a transparent PCI-PCIe bridge with the P17C9X chip, which worked.
Well, it worked, but not optimally:
Code:
RadeonHD.chip (0): RadeonHD card successfully opened
RadeonHD.chip (0): UBoot has not initialized the graphics card's interrupt line. Disabling interrupts.
RadeonHD.chip (0): Please upgrade your UBoot firmware.
And this is what it looks like in Ranger - the interupt is indeed not initialized correctly:
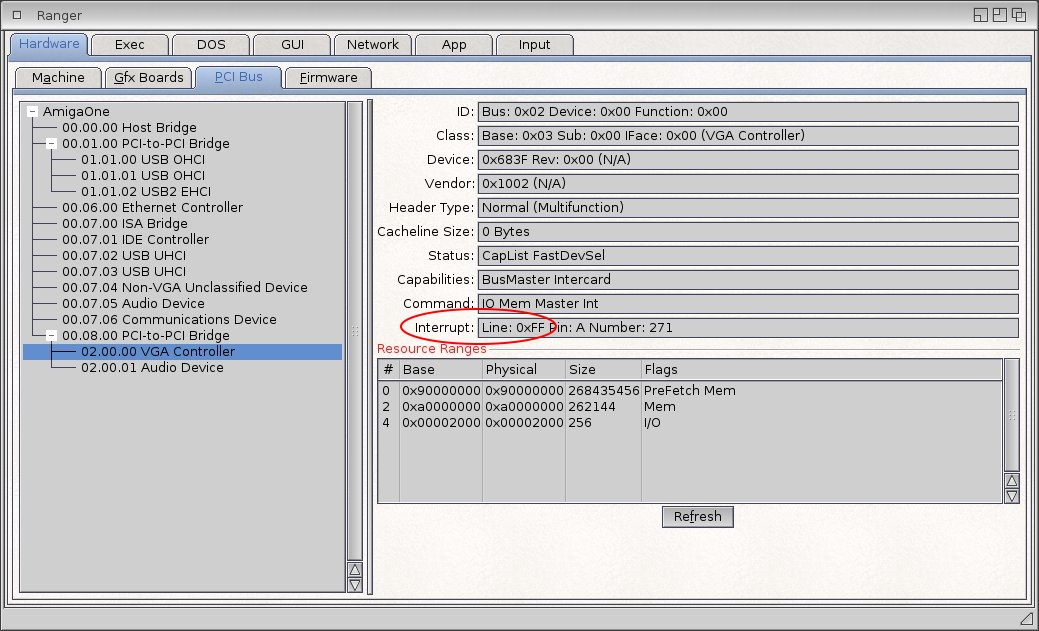
In the left part, the device 02.00.00 - PCIe card HD7750 is selected in blue. On the right in the red ellipse is set Interrupt: Line 0xFF. The 0xFF and 0x00 values are invalid, the card does not generate interrupts.
This is not the fault of any drivers or the card itself, this is really the work of U-Boot.
And it's quite unpleasant, because without interupts the card will be even slower. So we already have a slower 33 MHz PCI slot, a delay on the PCI-PCIe bridge and now we are even without interupts.
Next on picture is the PCI address 00.08.00, this is our PCI-PCIe bridge in the first PCI 33 MHz slot. Notice that after the bridge we have another PCI bus ( 02.xx.xx ) and on it the first device 02.00.00 is our PCIe graphics card. The card also contains Audio device 02.00.01, for which AmigaOS does not have a driver.
And to make sure the PCIe card is not alone, we also see a USB 2.0 card in the PCI 66 MHz slot ( 01.01.00 to .02 ).
6. Using the PCI 66 MHz slot for other cards
If we don't put a PCIe graphics card in the 66 MHz slot, we would like to use it for something else. Maybe a SATA controller, that could benefit from the speed.
But as it turned out, plugging cards other than graphics cards into the PCI 66 MHz slot is not quite possible. Either they were non-functional because U-Boot sometimes didn't recognize the card:
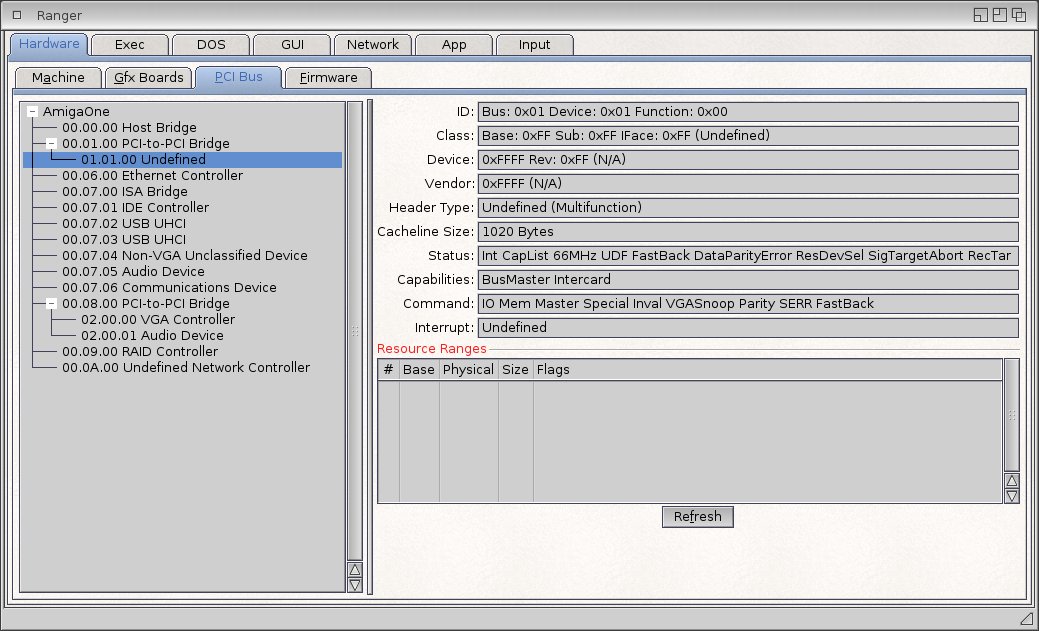
As here in the case of the USB 2.0 card ( 01.01.00 Undefined ).
Or the U-Boot recognized the card:
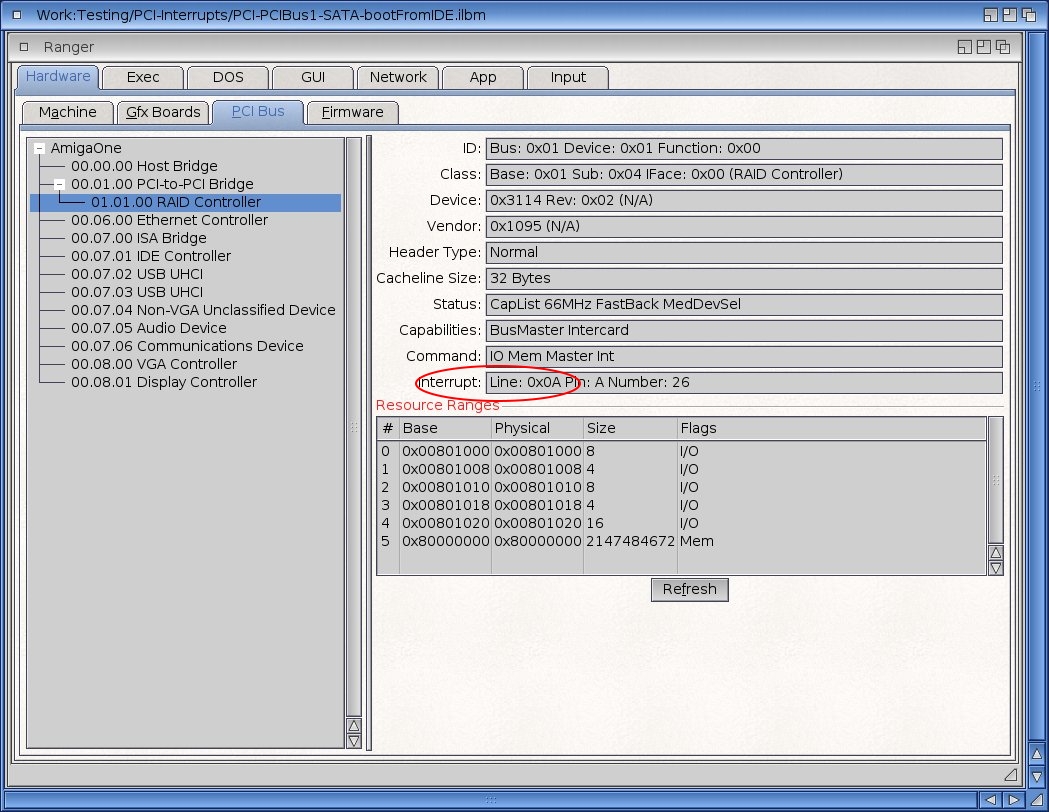
He even assigned the card the correct interrupt ( Line: 0x0A ) as here for SATA.
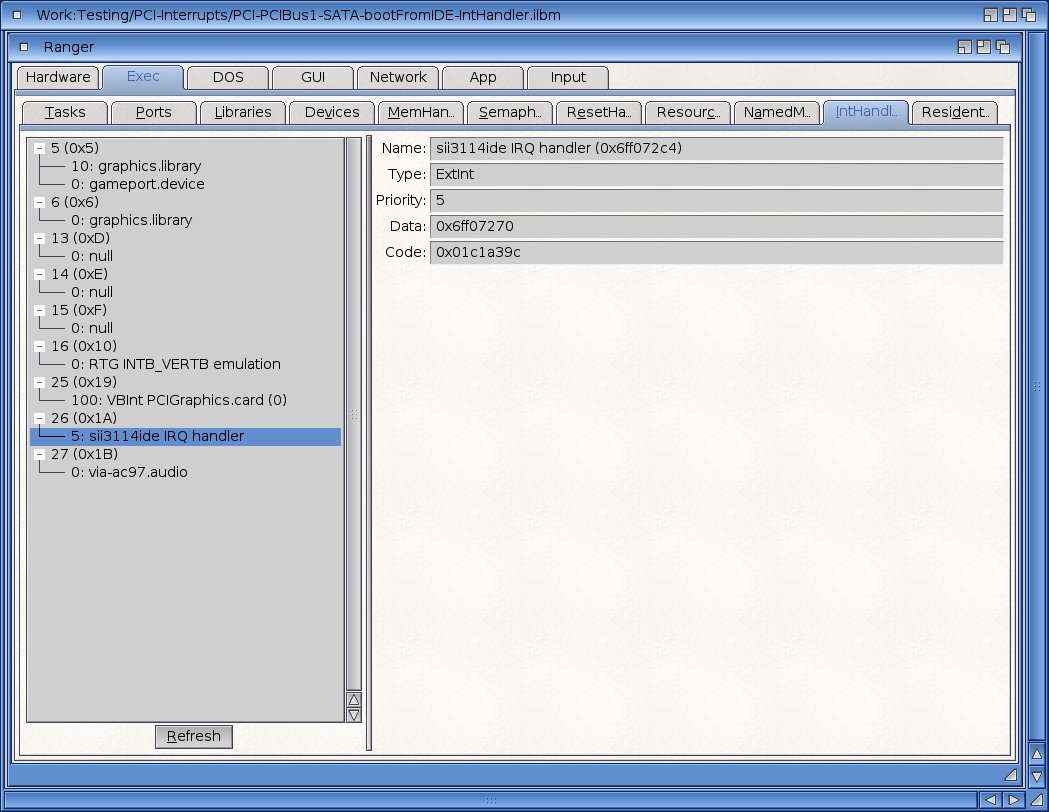
In AmigaOS, the assigned interupt is correctly visible in the interrupt handler ( 26: sii3114ide IRQ handler ), but the card still did not work.
In MediaToolbox the connected SATA disk is visible, but without details and the status is "not supported". No partition can be mounted. And this is how it looked in the debuglog:
Code:
[sii3114ide/scsi_get_capacity] cant get drive capacity from unit 0
[sii3114ide/cmd_custom] direct command 236 returned -1, ec 31
The greatest success was achieved with a 1 GbE NIC card.
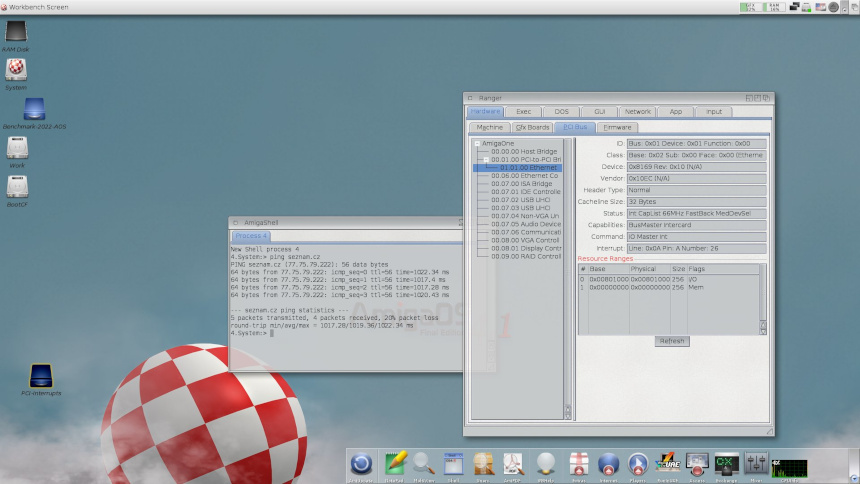
In this configuration, ping and DNS queries work, but anything more complex does not.
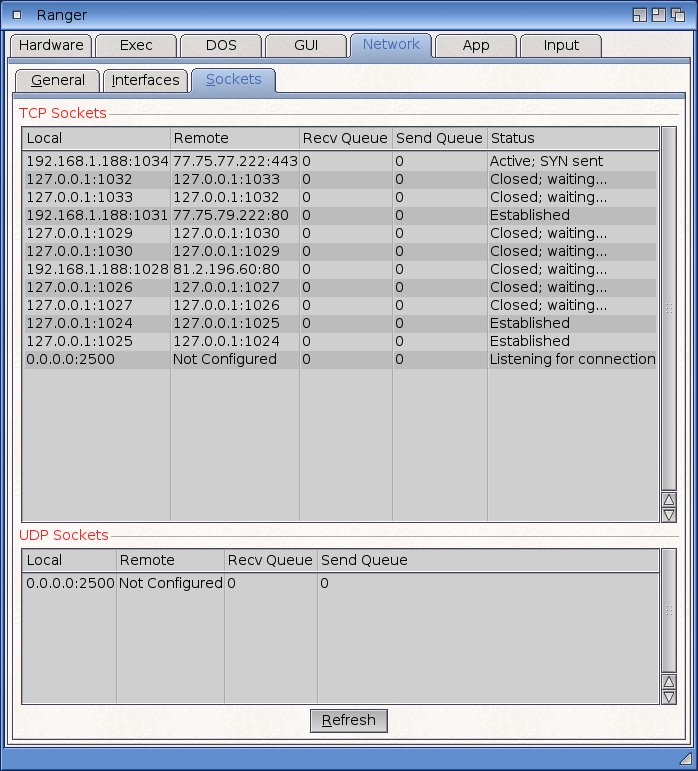
Here you can see the open sockets when loading seznam.cz webpages. They open correctly, but no traffic follows. There's just something weird.
I don't even know which part is responsible. U-Boot allocates the interrupts, the interrupt handler is set up correctly in AmigaOS, but the drivers only work very partially.
Someone from the trinity of motherboard, U-Boot and AmigaOS drivers just doesn't consider that there could be anything other than ( one ) graphics card on PCI bus 1. Too bad. So we probably dropped one of the two advantages that AmigaOne XE has over Pegasos 2.
7. And finally the promised comparison of AGP and PCI-e cards
During testing, it turned out that the native Warp3D driver for PCIe cards (Warp3D-Southern Island) does not work perfectly in AmigaOne XE. Or rather, it almost always crashes. There are not such a big incompatibility with Sam440 or X1000. That would be too bad, we couldn't even use MiniGL then, which is most classic 3D games. Fortunately there is a replacement for MiniGL, MiniGL4GL4ES. This wrapper redirects all MiniGL function calls from Warp3D to Warp3DNova and we can use the application happily.
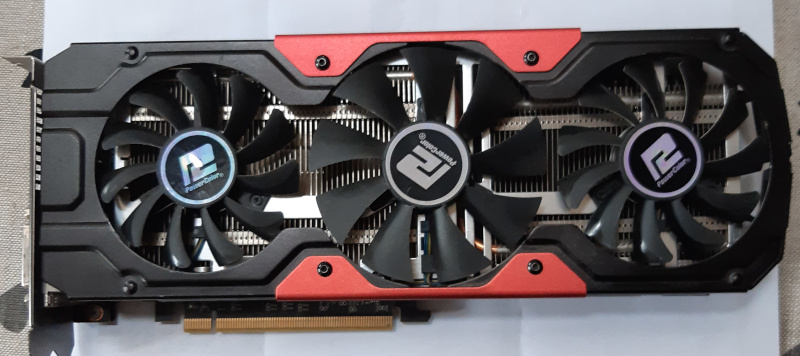
In the tests, we will only compare the most powerful AGP and PCIe cards: the Radeon 9000 PRO and R9 270X.
For speed testing, the AGP card is set to AGP, x2, sideband, and the serial debuglog and all commodities are disabled.
7.1 GfxBench2D
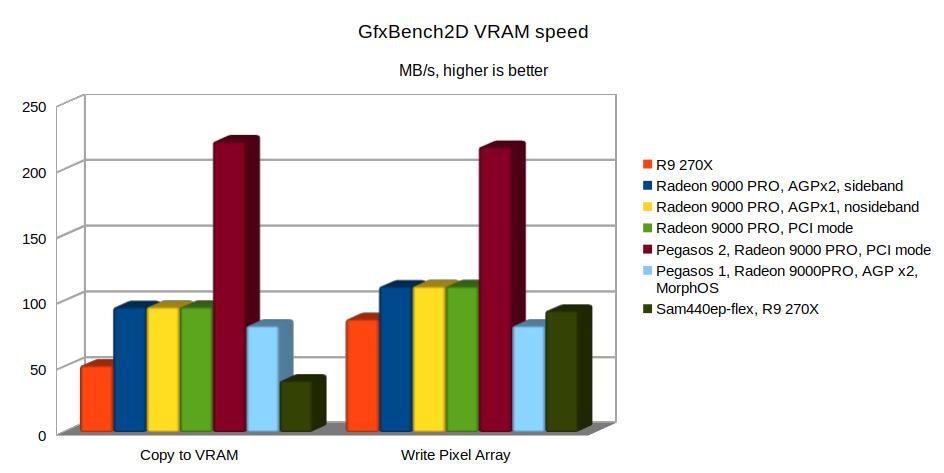
We will use this graphics benchmark first for another comparison - to test the speed of the graphics bus. From the overall test we will extract the values:
Copy to VRAM - the speed of writing to VRAM by the CPU and
Write Pixel Array - VRAM speed using DMA.
To give you an idea, the theoretical maximum bus speeds are PCI 33 MHz: 133 MB/s, PCI 66 MHz: 266 MB/s, AGP x1: 266 MB/s and AGP x2: 533 MB/s.
7.1.1 VRAM Speed: Articia S / AGPx2, AGPx1, PCI mode
First, for the AmigaOne XE, let's look at the difference in PCI bus 1 speeds in different modes - that is, with different AGP Bridge / AGP bus settings in U-Boot.
I tried the Radeon 9000 PRO card in the AGP slot, in AGPx2, AGPx1 and PCI 66 MHz modes ( blue, yellow and green values in the graphs ). You can see that the speed is practically the same.
Copy to VRAM ( 95.3 MB/s ) and Write Pixel Array ( 111 MB/s ) are identical everywhere and the overall GfxBench2D results ( see graph in 7.1.5 ) differ only slightly ( AGPx2: 1854.52, AGPx1: 1831.39, PCI: 1830.17 ).
This is therefore a big disappointment, because the AGP x2 speed can be up to 533 MB/s. We are barely reaching a quarter of that.
7.1.2 VRAM Speed: Articia S vs. Marvell Discovery II
Now let's take a look at the difference in graphics bus speeds for the different Northbridges of that era. Let's test the Radeon 9000 PRO card again in AmigOne XE ( Articia S with fix ), Pegasos 2 ( Marvell Discovery II MV64361 ) and Pegasos 1 ( Articia S ). In the graph, the values are blue, bordeaux and light blue.
We can see that the Marvell Discovery II, even though it only has PCI 66 MHz bus, is almost twice as fast as the Articia S in AGP x2 mode. The Pegasos 1 is 25% slower than the A1XE, has a lower CPU frequency ( 600 vs. 800 MHz ) and an older version of northbridge Articia S.
7.1.3 VRAM Speed: Articia S vs. AMCC 440ep
If we look at the graphics bus speeds in the AmigaOneXE ( 800 MHz ) and the Sam440ep-flex ( 733 MHz ) with the R9 270X card, the result is ambiguous ( red and khaki values in the graphs ). The Sam440ep-flex also has only a PCI 66 MHz bus and is 23% slower when using the CPU and 7% faster when using the DMA.
7.1.4 VRAM Speed: AmigaOne XE and AGP and PCIe cards
So, finally, we're going to try out a modern PCIe card in the AmigaOne XE. As was once the case with the Sam440ep-flex, there is a noticeable slowdown caused by the PCI-PCIe bridge in the A1XE. The AGP card is almost 50% faster when copied to VRAM by the CPU and 22% faster when copied by the DMA ( red and blue values in the graphs ).
So the AGP x2 speed in XE does not even reach the theoretical PCI speed of 33 MHz, so maybe we should not be so sorry that our PCIe card is only in a PCI 33 MHz slot. Overall, the northbridge of the Articia S is unexpectedly slow.
7.1.5 GfxBench2D - overall score
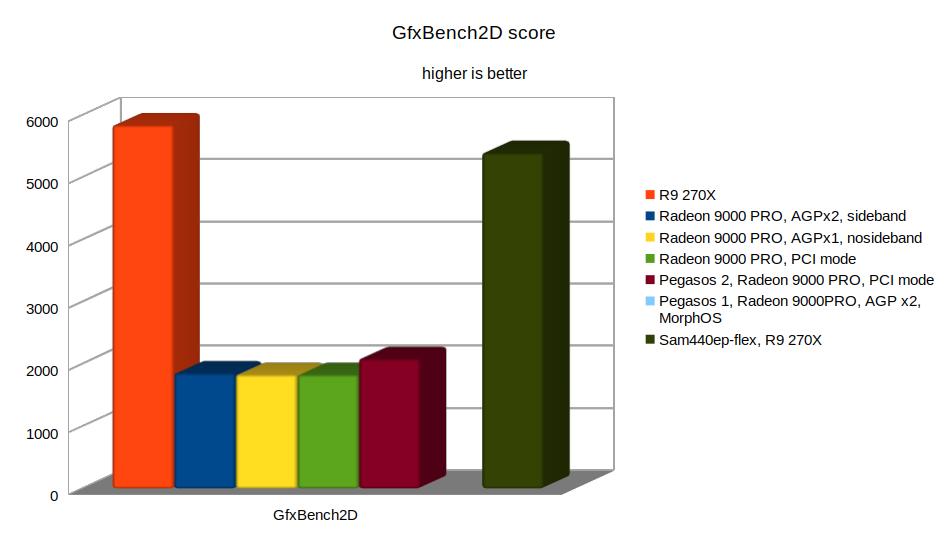
The overall results of the GfxBench2D test are not surprising ( red and blue values in the graphs ). The PCIe card R9 270X scores three times higher than the AGP card. So it is very powerful, but we will see how it will be hampered by the slow data flow over the bus.
7.2 Cow3D - Warp3D and Warp3D Nova
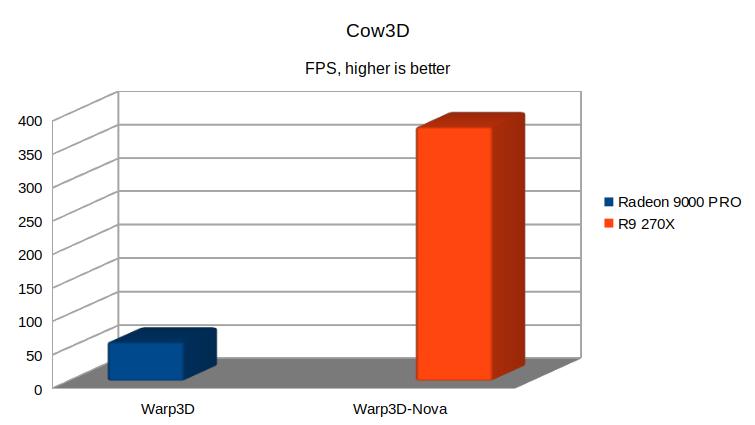
The R9 270X with Warp3D crashes (Warp3D-Southern Island really isn't ideal for XE ) and the Radeon 9000 PRO is not Warp3D Nova capable. Warp3D Nova as we know is much faster.
7.3 SDLBench
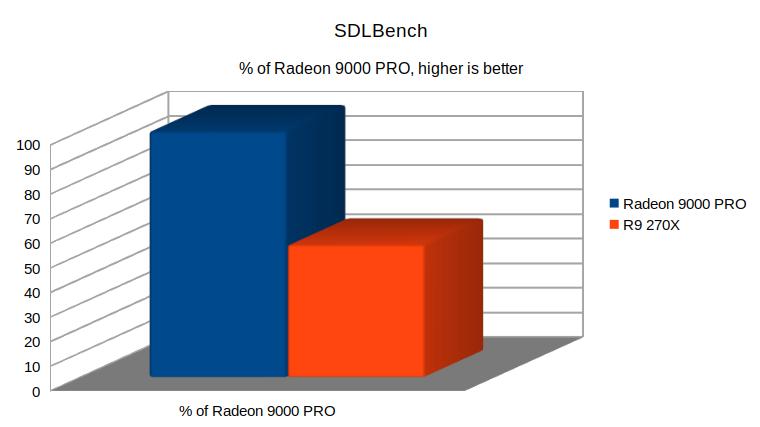
R9 270X achieves only 53% of the speed of Radeon 9000 PRO. PCIe bridge and missing interupts are a big slowdown.
7.4 MPlayer
Tested with MickJT-MPlayer and trailer from Serenity-HDDVDTrailer.mp4, 1280x720 pix, codec H.264.
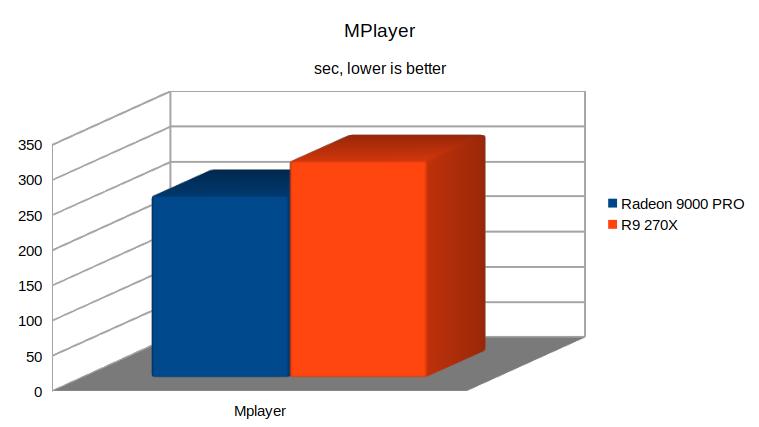
Here, surprisingly enough, the Radeon 9000 PRO is faster. These are the complete results:
Radeon 9000 PRO:
[VO=p96_pip]: VC: 194.186s VO: 57.643s A: 0.000s Sys: 6.350s = 258.180s
R9 270X:
[VO=comp_yuv2]: VC: 191.750s VO: 109.399s A: 0.000s Sys: 6.500s = 307.649s
We can see that video decoding (VC) takes practically the same time, which is not surprising because it is done by the CPU and the main difference is video out (VO) where [p96_pip] on the AGP card is faster. Just again PCIe bridge and missing interupts are a big hindrance for data transfer.
For comparison Sam440ep-flex 733 MHz with R9 270X:
VO: [comp_yuv2]: VC: 241.269s VO: 67.617s A: 0.000s Sys: 2.347s = 311.233s
You can see that Sam is is being held back by slow CPU, whereas the video out on the PCIe card is much faster than on XE.
So even though we are faster overall than on Sam440ep-flex, even on AmigaOne XE you can't play HD videos without framedrops. The actual length of the movie is 139 seconds.
7.5 FPS games
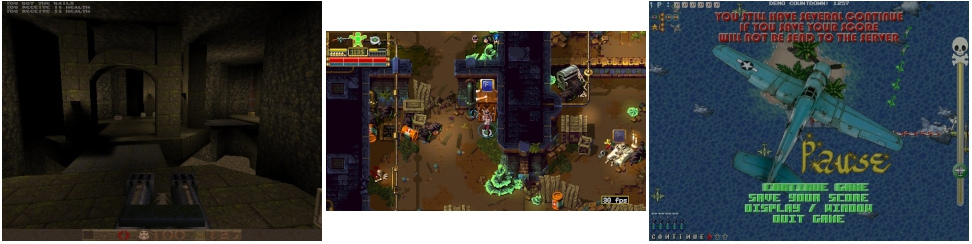
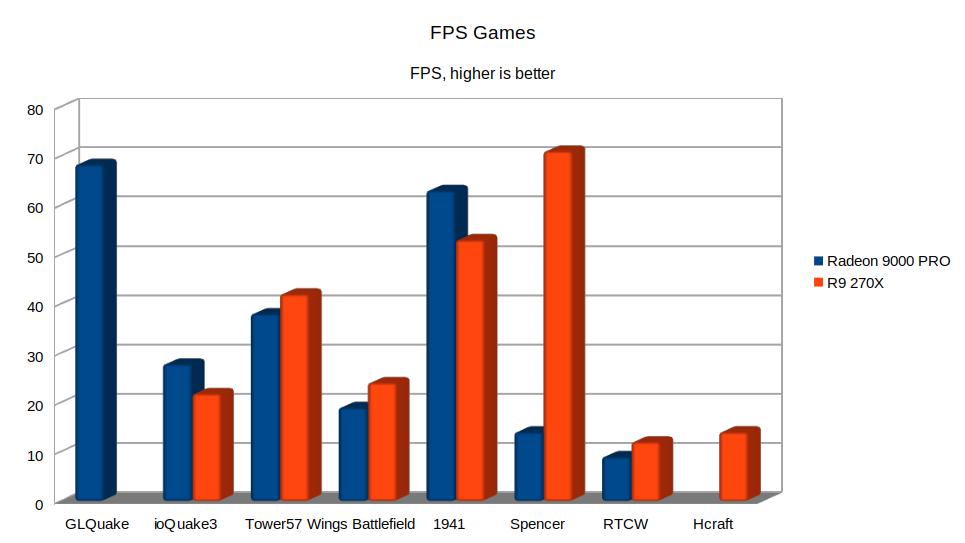
GLQuake (MiniGL): crashes on PCIe cards ( even on X1000 and Sam440 ). Both with classic MiniGL or with the MiniGL4GL4ES wrapper.
ioQuake3 (MiniGL/SDL2): faster is Radeon 9000 PRO.
Tower57 ( compositing ): compositing can be done better by PCIe card.
Wings Battlefield Demo ( Warp3D, Compositing ): here is a faster R9 270X card. And it could be even faster. Radeon 9000 PRO uses the Warp3D version for R100-R200, but the R9 270X Warp3D version for Radeon7xxx crashes, so you need to use the slower compositing version. However, it has to be said that the landscape rendering on the R100 and R200 chips is not very nice or high quality, so you won't be that happy with the game on AGP cards.
1941 (SDL): the Radeon 9000 PRO is faster, though not by as much as the SDLBench test would suggest.
Spencer (MiniGL, OpenGLES2): the game chooses the fastest interface and it shows - R9 270X with Ogles2 is significantly faster.
RTCW (MiniGL): R9 270X 12 FPS, Radeon 9000 PRO 9 FPS. Again on the highest details.
HCraft (GL4ES): of course, this game only works on a modern card.
7.6 Html 3D
The wirple.com/bmark website graphics test is the same for both cards - 14 FPS at the beginning of the test 1, Total score 21.
7.7 Emulators
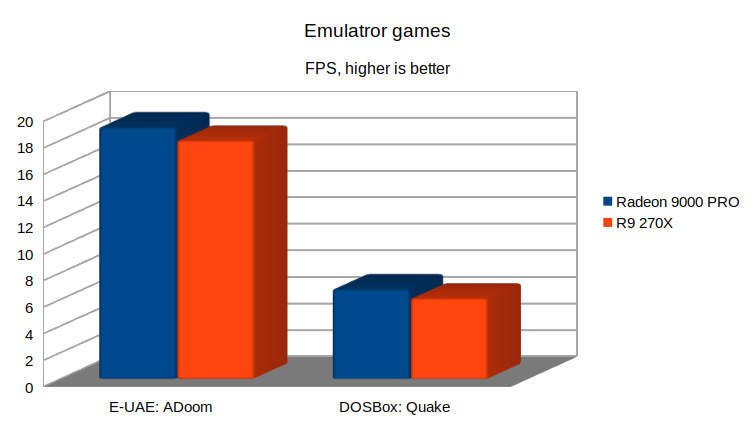
In the most used emulators, the AGP card is faster, but not dramatically E-UAE by 5% and DOSBox by 10%.
I wanted to try Doom3 on a PCIe card, but so far it hasn't worked. It needs the latest Enhancer 2.2, and XE doesn't quite get along with that.
8. To put or not to put a PCIe card in XE?
Pros:
+ on PCIe cards compositing is significantly faster. They are also a decade younger and has plenty of VRAM.
+ possibility to use Warp3D Nova and Ogles2 in games and programs. There are not many advantages here, but this one is quite important because the development of AmigaOS 4 by Hyperion is not progressing very fast and the main thing is happening today in the world of Enhancer by A-Eon.
Cons:
- the need to fit a PCIe graphics card into a slow 33 MHz slot.
- non-functionality of non-graphics cards in the PCI 66 MHz slot, effectively reducing the number of expansion cards. Plus, since we have a DMA-unfix, the additional 33 MHz slot should be occupied by a SATA controller. After all, internal IDE without DMA is really slow. So that leaves only one PCI slot for further expansion.
- RadeonHD is slower without interupts.
- not all classic applications work on PCIe cards.
- the latest versions of RadeonHD.chip and Warp3DNova are probably not beta tested with AmigaOne XE anymore, which indicates that development for XE will not continue. Not surprisingly, there won't be many, if any, users of PCIe cards on the AmigaOne XE. Too bad.
9. And the end
While I recommended modern cards for the Sam440ep-flex, I can't quite recommend them for the AmigaOne XE, especially because of the last two cons. The PCIe card is only there for the person who really can't be without one of their Ogles2/Warp3DNova games or applications.
And in one more similar case I would recommend a PCIe card - if by some miracle you manage to get it to work in Micro A1-C. The built-in Radeon 7000 card with 32 MB VRAM is really insufficient nowadays.
I'm sticking with AGP and Radeon 9000 PRO for now. I like Tower57 the most out of the latest games and I can play it fast enough with AGP, albeit 4 FPS slower.
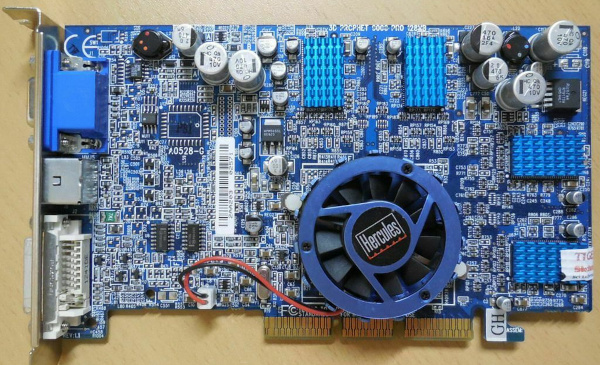
One more note on card selection. Radeon 9000 Pro can normally be found with either 132 MB VRAM at 250 MHz or 64 MB at 275 MHz. I would prefer the first option.
Fortunately, I came across the Hercules 3D Prophet 9000 Pro variant, which has 132 MB + 260 MHz VRAM. It's just hard to find.
My impressions of the testing are mixed. On the one hand, the XE machine is fast enough, stable enough if you play with it, and capable of using modern cards. On the other hand, you can see that the development was really thorny and time-stressed back then, so there are many things designed only for specific uses. It is not foreseen that there could be two graphics cards on PCI bus 1 ( AGP + PCI 66 ). Nor is it estimated that there should be anything other than a graphics card at all. And U-Boot behaves a little differently each time when working with PCI.
I promised last time that this article would be too technical, but it didn't turn out well. If I put the technical part here, it would be too long. So I'll save it for the next ( maybe ) installment on the PCI subsystem and interupts. Let's see if something can be done with the interupts after all.
And for those who have lasted this far, some interesting stories from the field of alchemy.
Alchemist's Corner No.3:
During the rehearsals, for example, I came across some real curiosities:
Fitting the Radeon 9250 card on PCI PCI bus 0 ( 33 MHz ), in the first slot, so all other slots unplugged, causes an interesting side effect:
Uboot can see the DVD in the internal ATA controller a1ide:0 ( primary master ) but can't see the SSD (with IDE converter) in a1ide:2 ( secondary master ). Just add any card in another slot, and hey, it can see both devices!
Similar case:
Configuration PCI 33 slot 1: SATA, slot 2: PCIe bridge+gfx. Testing all day, works. Next day I turn on, U-Boot fine, but AmigaOS can't boot, can't see SATA SSD. Just swap PCIe bridge+gfx to PCI 33 slot 3 and hooray, everything as it should be...
And for the third time on the same subject:
Configuration PCI 66: USB, PCI 33 slot 1: SATA, slot 2: PCIe bridge+gfx. Again same scenario, works for a long time, then just shut down for a few hours and AmigaOS can't boot, can't see SATA SSD. Just take out the USB card and yay, moving on!
I have to get a black cat, parchment and retort somewhere. I've already got the mortar and the alcohol for the stove.
2024 addendum
Today we have NovaBridge to run legacy Warp3D applications on modern PCIe cards. But I am not tested it on AmigaOne XE. Even it greatly improves compatibility of older games ( and you can probably play GLQuake with it ), the limitation of PCIe card bus speed ( 33 MHz slot, PCI-PCIe bridge, no interrupts) is still exists, so PCIe cards aren't worth using.