During the Amiga Classic era (1985-1994), I built a home recording studio using two Amigas and some sound equipment. This home studio started out very small and grew into a very complex system over the years. The goal of the system was to produce an Audio CD of original music, without disturbing the neighbours. It was a success. When It began, I knew nothing about music, MIDI, or audio recording. When it was done, I was a composer, a performer and a studio engineer.
From 1998 until 2004, I had no Amigas and put all of the studio equipment in storage. Then I bought my AmigaOne in 2004 and reacquainted myself with the Amiga OS. I knew from my reading that there was going to be Audio Evolution native on OS4, but I still would need a MIDI sequencer and some interfaces and drivers, to get back into music. After the release of the CAMD library and MIDI interface drivers for the gameports of the SB Live! and the A1XE, I got the sound equipment back out of storage. After the release of Bars n Pipes version .5 (beta) and the drivers for USB MIDI interfaces, I started building a new music studio that will have my A1XE at its heart.
I removed all components from the electronics rack. I removed all cables and power cords. I dusted it all off and started over. So far I have built enough to generate sounds and hear them. The recording of those sounds will have to be covered in another article later.
With the current setup, Bar n Pipes can record MIDI messages from a MIDI controller keyboard, a MIDI drum pad, or a MIDI guitar. It can play MIDI messages to any and all of my MIDI equipment. The audio output of all audio equipment is combined into one stereo pair by a line level mixer. The audio output is routed to the sound card line input on a PC with 7.1 surround sound speakers. (Windows PCs, they are not just for heating the room, you know.)
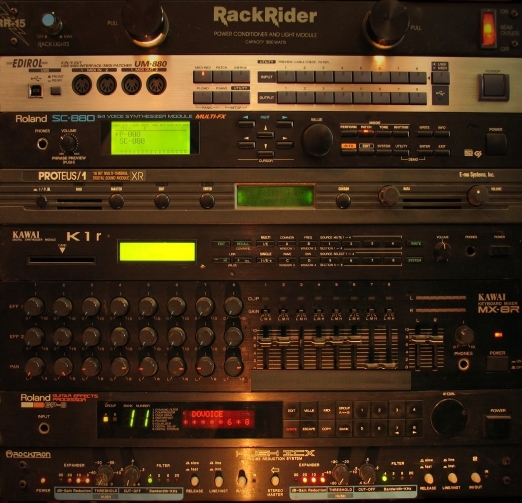
On the top is a power conditioner with lights. The second one down is the UM-880 USB MIDI interface. Then there are three sound modules (synthesisers without keys). Below the sound modules is the line level mixer. Under the mixer is a MIDI controlled electric guitar multi-effects unit. At the bottom is a stereo noise reduction system.
MIDI messages go from the A1 through the USB cable to the outputs on the UM-880. Output 3 is routed to the MIDI in of the Roland SC-880 sound module. Output 4 is routed to the MIDI in of the Proteus 1XR. Output 5 goes to the Kawai K1r. Output 6 is connected to the GP-8 for switching the effects on and off, and controlling my guitar volume while I play. Input 1 is being used for any of three MIDI input devices, (MIDI Controller, Drum Pad or MIDI guitar) to send messages to the AmigaOne. In this configuration Bar n Pipes can play 48 MIDI channels to the sound modules, I can play my guitar, my effects and volume are controlled, and I can hear it all in my headphones from the line mixer, or through the PC's speakers.
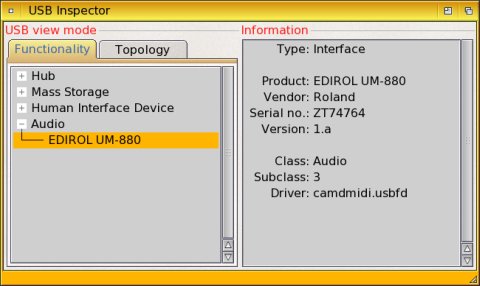
This is what the USB Inspector sees when I connect the USB MIDI interface to the USB Hub on my A1.
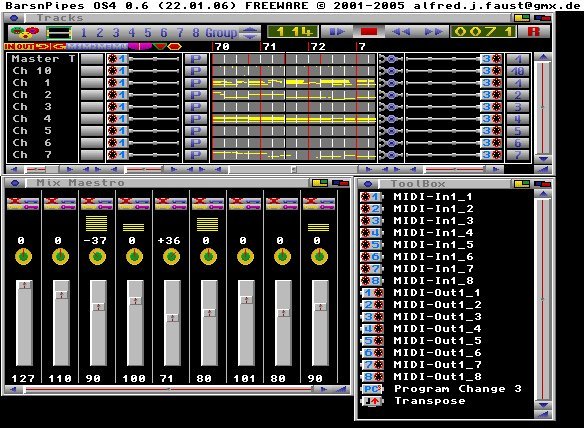
This is a screen capture of Bars n Pipes version .6 (Beta) playing a song. The tracks window shows the song being played. In this case all of the tracks are being played to MIDI output 3. The Mix Maestro window shows the volume and pan settings of the tracks being played. The Toolbox window shows the tools that I have installed so far. Since I have only 1 USB MIDI interface and it has 8 MIDI ins and 8 MIDI outs, I loaded the corresponding MIDI in and out tools into the toolbox.
In the track window I set the connections for the MIDI in and MIDI out tools. You do this by double clicking on the MIDI tool that you want to establish a connection for and then clicking on set connection and choosing a connection. The MIDI in tool of the current version of Bars n Pipes has too small of a text window to view the full name of the connection selected. If you choose the right one from the list it will work just fine. The text window is long enough on the MIDI out tool and I'm sure the MIDI in tool will be fixed. Because computers count from 0 and people count from 1, the connections get a little tricky. For my MIDI in tool (MIDI-In1_1) I use connection EDIROL UM-880.in.0. For my MIDI out tool (MIDI-Out1_3) I use connection EDIROL UM-880.out.2.
Note: The connection number is one less than the MIDI interface number. When the connections are set it all starts to make sense. When I put the MIDI out 3 tool on a track in Bars n Pipes that equates to the MIDI out 3 jack on the UM-880, which is cabled to the Roland SC-880 sound module's MIDI in. By changing the MIDI out tool I use in Bars n Pipes I choose which MIDI out jack on the UM-880 gets the track. In so doing I choose which sound module or effects unit gets that stream of MIDI messages.
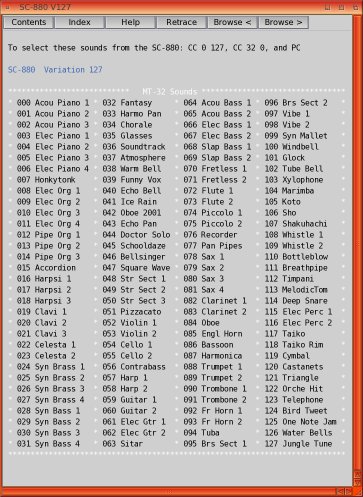
I find it useful to make an Amigaguide file containing information that I need when sequencing MIDI. This prevents me from having to dig out the manual for each piece of MIDI equipment constantly. This guide file contains information on which sounds are in each sound module and how to call them up. It tells me which MIDI controllers each box understands. It has information on drum kits and drum sounds. I am currently updating it to contain information on the new UM-880 USB MIDI interface. (I am using Heddley 1.1 from Aminet and OS4's Notepad to work on the guide.)
This is what I've learned so far about building an Amiga based home recording studio:
- Use the shortest possible cables you can. (It keeps the inside of the rack from becoming a tangle.)
- Label the ends of the MIDI cables as IN and OUT. (It helps when configuring the equipment.)
- Keep an updated drawing of how it is put together. (It makes expansion a snap.)
- Keep notes, write down valuable MIDI related information. (My Amigaguide does this.)
Equipment to be added into this studio setup:
- A 16 channel line mixer will replace the 8 channel one in use today.
- A MIDI controlled guitar amp. and speaker cabinet simulator.
- A MIDI controlled bass amp. and speaker cabinet simulator.
- A MIDI controlled effects processor for the vocalist.
- A MIDI controlled reverb unit.
That's all of the sound generation and processing equipment I think I'll need.
Next up will be using Audio Evolution 4 for the mixing and recording. I'll let you know how that part goes in another article.
Written by: Tom "DoodooHead" Gastineau
Edited by: Jonathan "GiGa" Haddock
Published:6th February 2006


