
*) citation "Egyptian quickly and easily" is from my favorite comedy/parody movie Adéla ještě nevečeřela ( Adela Has Not Had Supper Yet ).
A must-see scene ( 2‘27” ) - A Czech detective shows to American detective the beauties of Prague: https://www.youtube.com/watch?v=LfxAHguz55k - in international language ;-)
EN https://www.imdb.com/title/tt0075633/
CZ https://www.csfd.cz/film/5981-adela-jeste-nevecerela/prehled/
trailer ( 1‘40” ): https://www.youtube.com/watch?v=p9ctCr_mJnI
This article was originally published on amigaportal.cz in October 2022, in this version are corrected some inacuracies.
This article is really just a talking. You'll find a story here, not something groundbreakingly new. There aren't even my favorite benchmarks or charts. If anyone is expecting a technical article don't despair, the article will have a sequels where there will be too much technical stuff.
Introduction
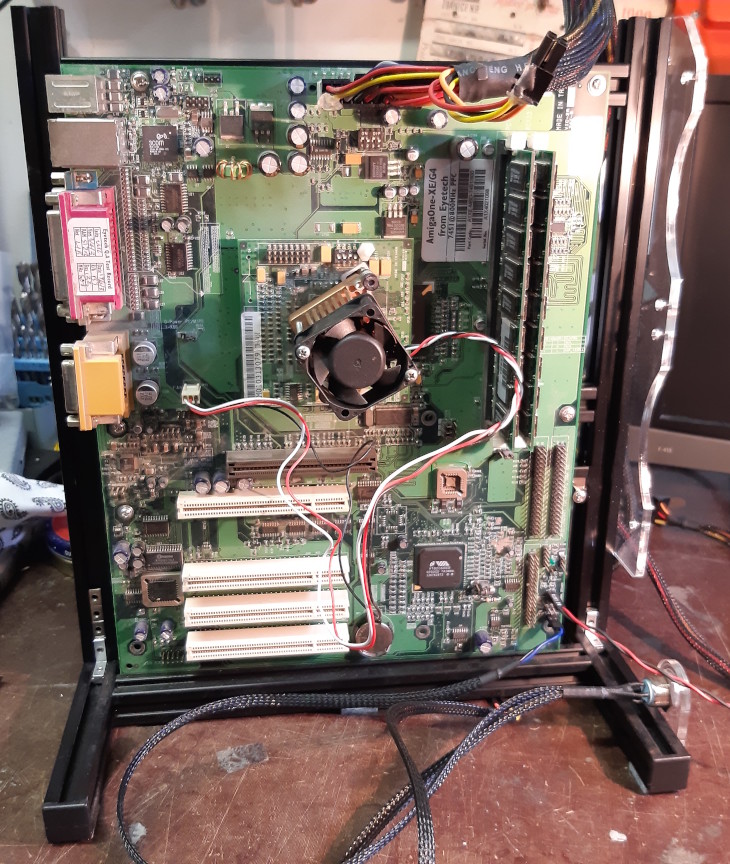
At the beginning of spring 2022 I got an AmigaOne XE from fellow American. Paul wrote at the time that he had driven with a parcel on a long snowy drive up the valley to the post office. And with them, everything is quite far away. But he arrived safely and the Amiga came to us.
I quickly tried the Amiga and put it on the testbed, but then it sat there for a long time, until the end of September. Work, garden, holidays, Mac Mini, work again, family parties...
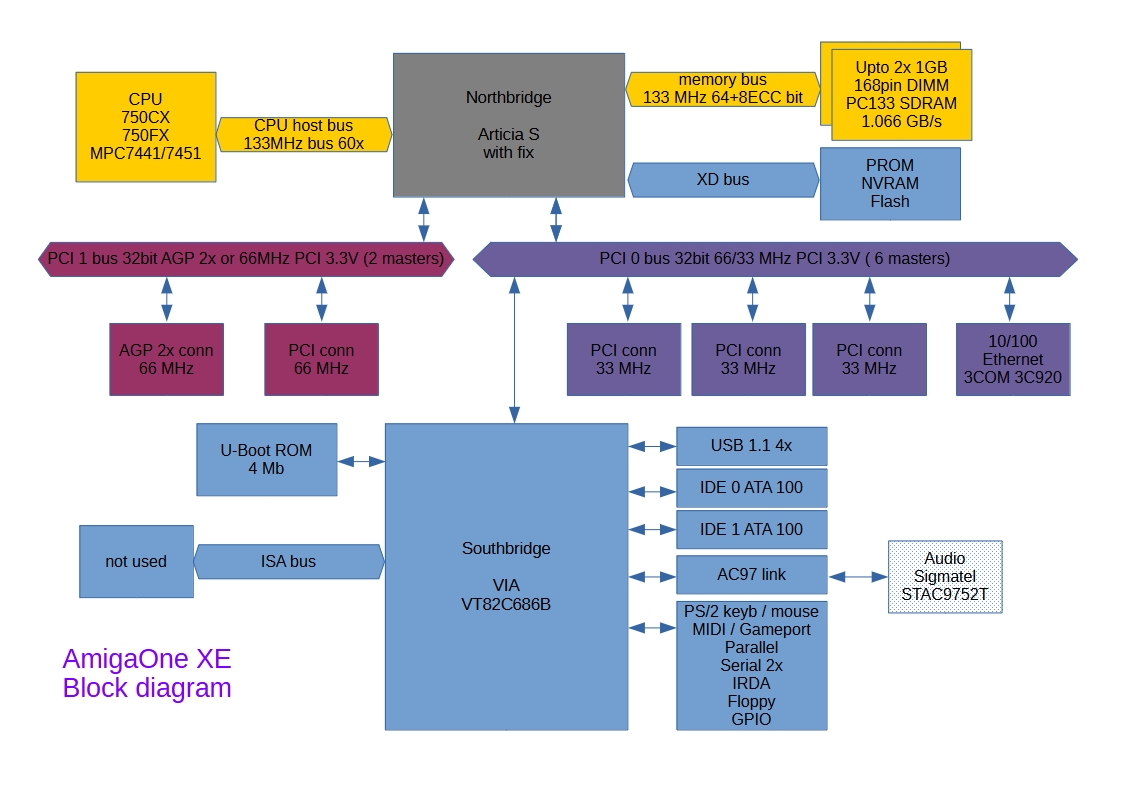
But first a few words about AmigaOne XE in general. It was manufactured by Eyetech from 2004 to 2006 and is the successor of the developer board SE.
Specifications:
Motherboard is ATX format.
CPU is on a separate board with MegArray connector, equipped with G3 750FX or 750GX / 800 MHz, G4 7451 / 800 MHz or 7455 / 933 MHz processors. Faster CPUs were later offered by companies such as ACube Systems.
The Nortbridge is an Articia S with fix ( fixed version of Pegasos 1 / AmigaOne SE northbridge ) with the following features:
- 133 MHz SDRAM memory controller, max 2 GB ( 2x 1 GB )
- PCI bus 1 in AGP x2 mode or PCI 66 MHz mode ( there are two connectors on the motherboard, AGP and PCI 66 MHz, theoretically both can be used simultaneously in PCI mode )
- PCI bus 0 in PCI 33 MHz mode ( three PCI 33 MHz connectors on the motherboard )
Southbridge is a VIA 82C686B with the following features:
- 2x ATA 100 controller
- floppy disk controller
- parallel port
- 2x serial port
- AC97 digital audio
- 4-port USB 1.1 controller ( 2x internal, 2x external)
- P/S 2 mouse and keyboard
- MIDI/gameport
In addition, a 100 Mbps Ethernet 3Com 3C920 is connected internally to the PCI 0 bus.
The AmigaOne XE was the first good computer for AmigaOS 4, but it had a few bugs at first. In particular, the fixed Articia S still had a cache coherency bug. Furthermore, there was a conflict in DMA transfer on the internal ATA controller with the Ethernet controller, and there was a problem detecting USB device swapping. Also, initially the onboard sound chip did not work.
These errors have been corrected in various ways. Cache coherency has been fixed by modifying the drivers, i.e. deleting the cache and thus occasionally slowing down. DMA was fixed in hardware, Eyetech released a DMA-fix guide ( interrupted and added several routes on the motherboard, moving the resistor ). This fix addressed the DMA transfer errors but also prevented the use of the PCI 66 MHz slot and had other hidden effects. This didn't matter so much, though, because virtually everyone was using AGP cards. On USB, Eyetech again released a guide to the HW fix ( adding terminators to routes ) this time without the side effects. Because the sound was initially non-functional and needed to use a PCI sound card, later motherboards shipped without a sound chip. But later it was discovered that the Southbridge contained some undocumented bits in the registry, so it was enough to fix the driver and those who had an earlier version of the board with the chip could use the sound happily. However, not to make the others sad, the PCI card provides better sound.
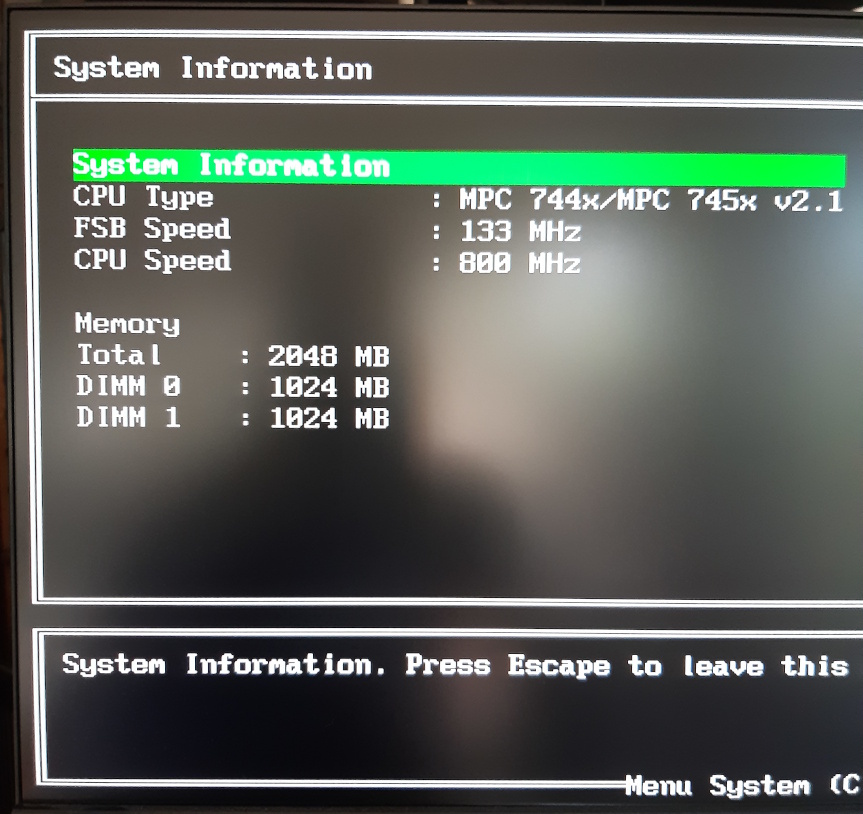
My Amiga XE has a G4 7451 CPU clocked at 800 MHz, 2 GB of memory, it had a DMA-fix but not a USB-fix and it contains a sound chip. It has the U-Boot 1.1.1 firmware, which is the last official one released by Hyperion.
What could we improve on this Amiga? Well memory is maxed out, so all we have to do is pick the best graphics card, try to add a SATA controller, 1 GbE NIC and a USB 2.0 card. However, the Articia S is ( as we also know from the Pegasos 1 article ) quite picky about PCI cards, so let's see if we can at least get some of that done.
1. DMA-unfix
How about taking advantage of the fact that the XE also has a PCI 66 MHz slot and see if you can use PCIe cards? On the Sam440ep-flex this brought significant improvements and especially the possibility to use the new Warp3D Nova and OGLES drivers. Unfortunatelly my XE has had a DMA-fix done, so the PCI 66 MHz doesn't work. I first looked for documentation on exactly what the modification looks like. I asked around the forums and finally walkero sent me the documentation of the DMA-fix and USB-fix hardware modifications and helloworld put it on os4depot.net to make it available to everyone.
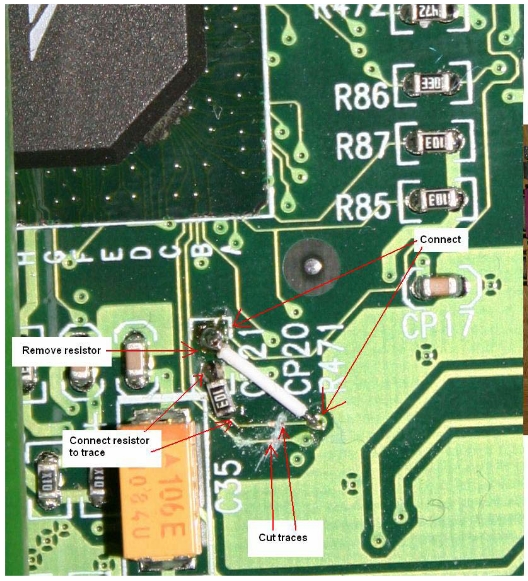
Then I was determined for a long time to make a reversion to the original state, i.e. "DMA-unfix". The same fellow who pinned the Mac Mini overclocking for me helped again. It looked beautiful, I really don't know how he does it. My hand is shaking just looking at it.
2. Heatsink, fan, CPU
I gave my friend a motherboard to modify so I took off the CPU board, removed the heatsink, cleaned everything and looked at the exact type of CPU.
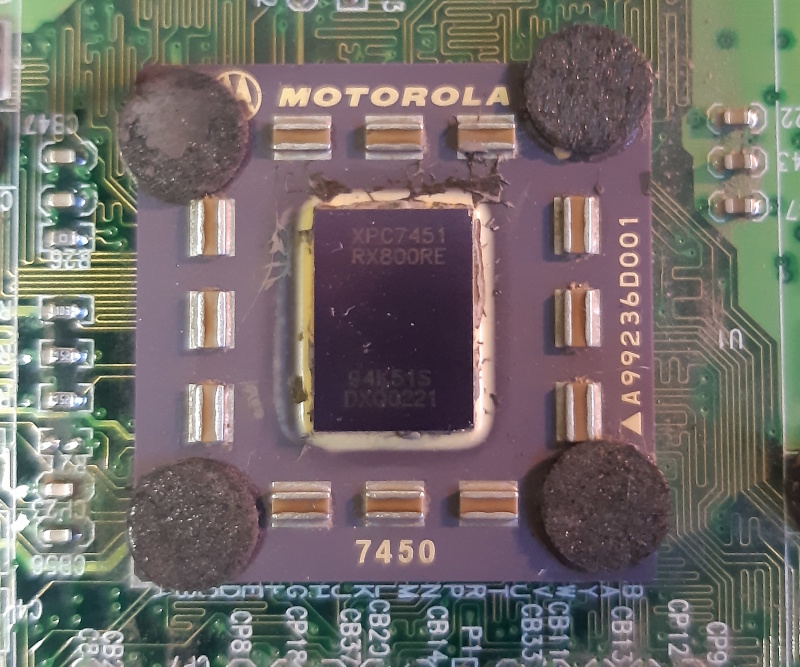
It is the XPC7451-RX800RE. So XPC means a Motorola "Pilot production prototype" ( standard production was then MPC ). RX is the case type, 800 is surprisingly 800 MHz, R = 1.65V +/- 50 mV Core Voltage and "on die" temperature 0-85°C and E is then Revision level.
This CPU has an L1 cache of 32 KB, L2 cache of 256 KB and L3 cache interface. 2 MB of L3 cache is placed on CPU module, but unfortunatelly is turned off, becouse of Articia S coherency problems.
That's good on the one hand, the 7451 CPU is a G4, so it has VMX ( AltiVec ), but it's a pilot series and the max temperature is only 85°C, so it might not overclock at all. We'll see, I have to be extra careful about the temperature and not expect miracles. If it will work at all, it will probably only go up a little.
The copper heatsink looked powerful enough by eye ( we're only talking a maximum of 22 W at 800 MHz here ), so I just fitted a new fan and put in new Arctic MX-4 thermal conductive paste.
What was worse, though, was that the MegArray connector looked like it had some of the pins bent, even when I took it off carefully.
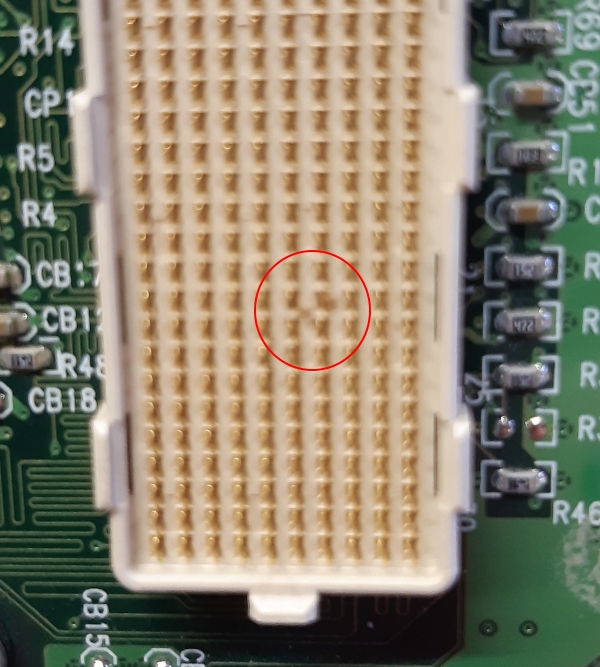
Under a magnifying glass, I used a sharp needle to comb through them and straighten them as much as possible, hoping for the best.
I then refitted the modified motherboard with the CPU board, put everything on the testbed, connected the basic peripherals and first only one RAM module and switched it on. And the Amiga worked.
3. Memory
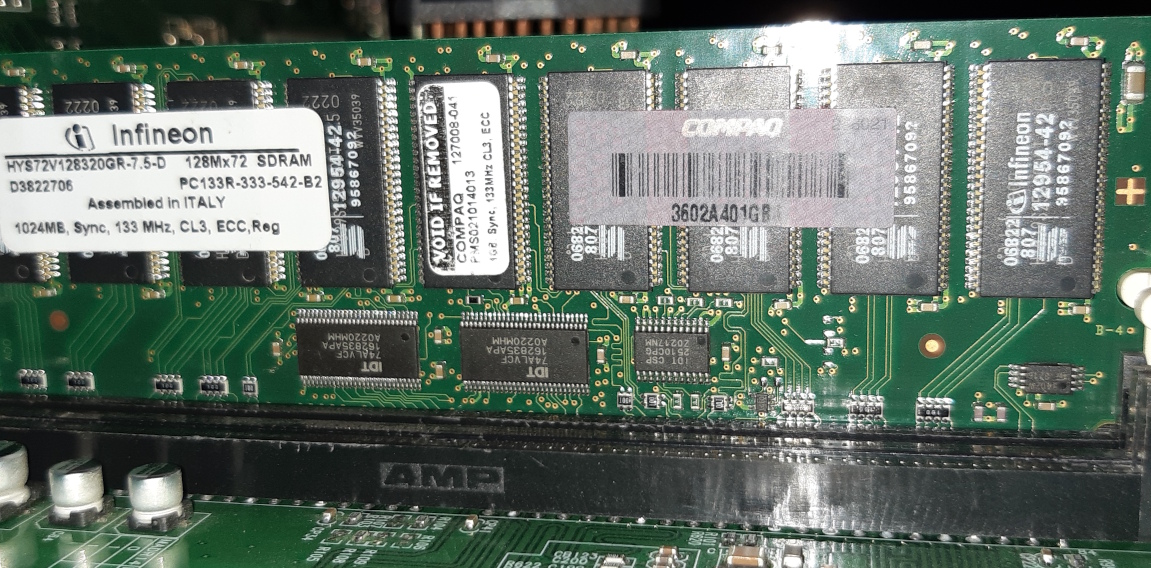
My XE contains 2 Infineon PC133, 1 GB, CL3, ECC, Registered modules. They work perfectly stable, so don't touch.
XE can also work with CL2 modules, they are faster, but vast majotity is no-ECC, no-Reg, so more risk of instability. I won't try. There are also CL2 ECC-Reg, but they are quite expensive and hard to find.
I strongly recommend to use Registered modules to avoid system instability. ECC is not important, but most of Reg modules are also ECC.
4. Disks and OS installation
Then you need to think about what and how to do with the disks.
If your AmigaOne XE has DMA-fix and the CPU is only 800 MHz, you can use an internal ATA controller with SATA converter and SSD. I measured the speeds and the internal ATA is only 3% slower than PCI SATA in DiskSpeed read, so that's below our resolution. The difference would only show up at higher CPU frequencies.
Anyway I want to have both SATA SSD and SATA DVD. But since I already had a DMA-unfix done and my internal ATA controller can't use DMA, I have to do it differently.
Fortunately, with XE, we have plenty of options.
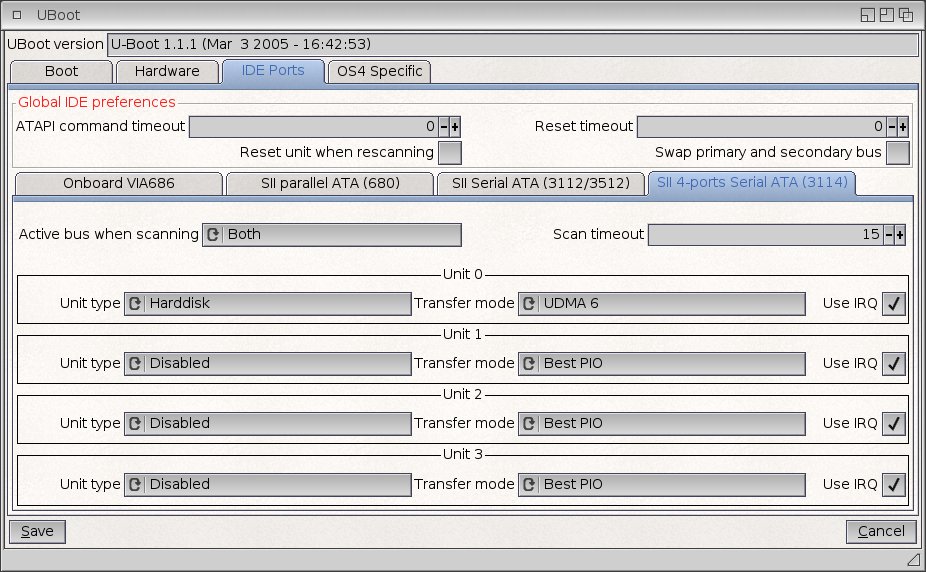
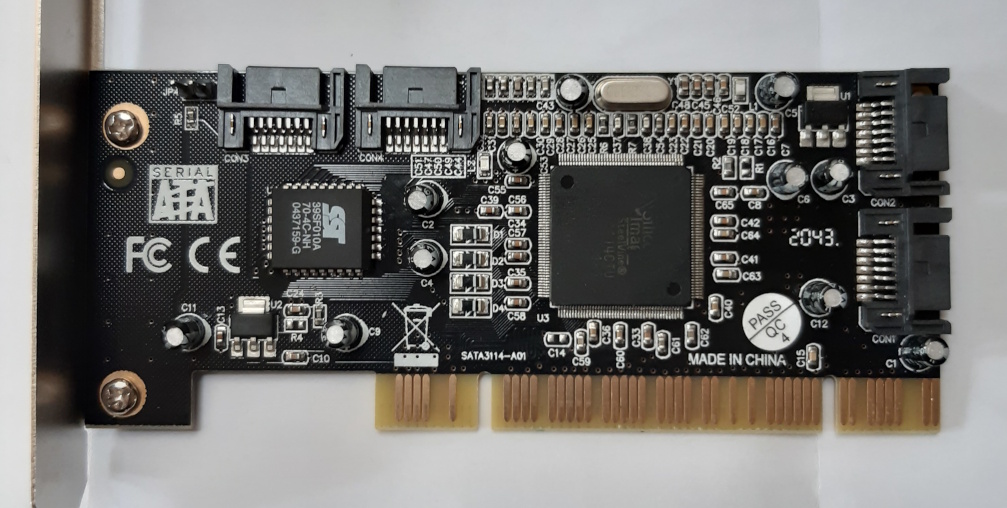
My XE has U-Boot firmware version 1.1.1, the latest official one from Hyperion. This version can already boot not only from the internal ATA, but also from the PCI controller SiI0680 ( ATA133 with DMA ) or directly from the dual port SATA controller SiI3112. It cannot boot from the SiI3512 ( 2 ports, newer ) or SiI3114 ( 4 ports ), as the newer experimental firmwares 1.1.4 or 1.2.0 supposedly allow. So much for the theory.
And what does the practice say?
First of all, for NG Amigists who are addicted to Pegasos 2 and X1000, AmigaOne XE ( and Micro A1-C too ) is a bit of magic. Or rather, alchemy, where you have to weigh everything a little bit at a time and mix it carefully.
First I found out that even though my U-Boot is supposed to be able to boot directly from the PCI SATA SiI3112 card, it can't. The U-Boot can see the disk, but when it is supposed to run the bootloader from it, everything ends with the magical message "No SLB found" ( SLB = second level bootloader ). And yes, I have SLB installed on the disk. I can't even boot the AmigaOS installation CD from SATA.
Furthermore, the usual bidirectional IDE to SATA converter ( Axago, DeLock ) in the AmigaOne does not work 100% with SATA DVDs, although it does with SATA SSDs. At least for me.
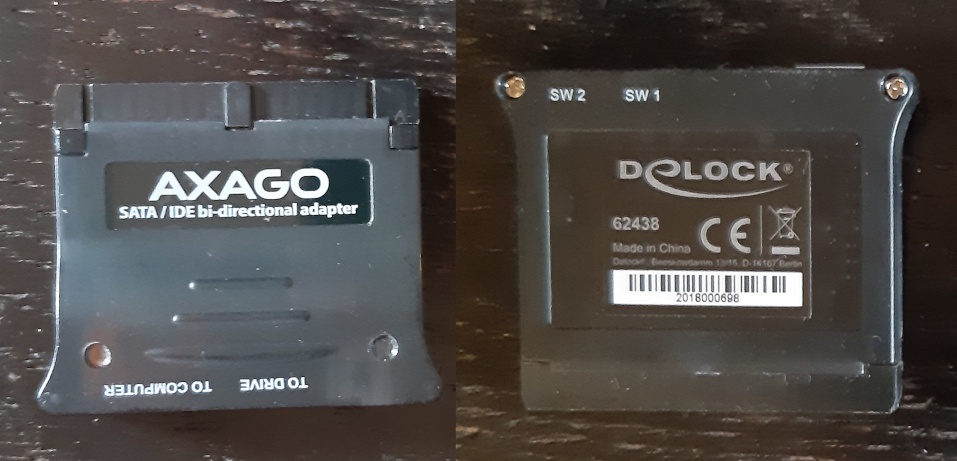
For DVDs, you need to use a one-way converter ( Koulwell ) SATA device - IDE motherboard.
The only other way to connect a SATA DVD is to a PCI SATA card, but then you can't boot from it, which we don't really want.
It is also necessary to set the disk parameters in the U-Boot environment variables. While for example with Sam440ep-flex ( my first machine with U-Boot ) you can leave everything unset and Sam will know itself, not here.
If you don't tell the controller that the disk is there, the system won't see it during boot, even if the bootloader has loaded the kickstart modules from it before. Interesting. You need to set mainly the variables a1ide_conf and sii3114ide_conf ( or analogous depending on the controller used ). These variables tell what is mounted in each position ( HDD, DVD or nothing ). The other parameters can then be set later and more conveniently after booting from Sys:Prefs/UBoot.
The description of all variables is in the documentation on the AmigaOS CD.
The last thing to watch out for is exactly how the slb_v2 bootloader works. In U-Boot, you set what disk to boot from. That's fine. It's just that if you have multiple partitions on that drive with a /Kickstart directory it won't show them all, only the one with the highest boot priority. So if we want to read /Kickstart from somewhere other than the System: partition ( like because we want to have SFS\02 on the system and some firmware won't read it ), we need to play with priotites and set the kernel parameter "BootDevice". Well, just a little bit of work, and if you are swapping disks to different controllers for testing, you will have to do a lot of work setting environment variables.
I also came across another interesting fact from the field of alchemy. When I have the rear USB 1.1 ports enabled in U-Boot, I can't boot from the SATA DVD in the ATA controller ("No SLB found" again ). If you are trying out configurations and changing controllers like socks, I strongly recommend disabling all devices in U-Boot that you don't necessarily need and leaving only the first serial port enabled for debug. It will save you a lot of nerves and time.
But just so I'm not complaining, unless you're testing controllers and Kickstarts and swapping disks here and there and if you know exactly what you're doing, it's about a minute's work. And even if you don't have your AmigaOne full of SATA cards and converters, it can even automatically detect classic IDE devices on the internal ATA controller so you don't have to set a1ide_conf.
So after many experiments and combinations I ended up with this configuration:
ATA primary master: IDE-SATA converter + SATA DVD
ATA secondary master: ATA/CF reduction + CF containing one partition
- FFS DOS\07: 2 GB for kernel modules ( i.e. the /Kickstart directory ). Slb_v2 should be installed on CF
PCI SATA controller SiI3114, equipped with SSD in the first port, contains the following partitions:
- FFS DOS\07: 2 GB ( not needed here, it's an unused reserve for possible kernel modules to boot even if the SSD is on the IDE bus and the firmware can't read SFS\02)
- SFS\02: 25 GB for System: ( yes, I know, it's supposed to be more like Workbench: but I started with Amiga NG on MorphOS and that's how I learned it)
- SWAP: 2 GB ( not need here, because we have 2 GB of real RAM )
- SFS\02: 100 GB for Work:
We select IDE like booting device in U-Boot. Then on boot, it starts the SLB v2 bootloader on the CF card, loads the kernel modules including SATA driver from the CF card, finds the boot partition on the SATA SSD and starts the System from there. Voilà. Simple. But I actually spent about two days on it.
After booting into the system it is a good idea to set the SSD to UDMA 6, 133 MB/s in Prefs:UBoot, because all devices are in PIO mode by default.
5. AGP and PCI 66 MHz slot test
Then it was time to test the DMA-unfix. So I won't test that DMA doesn't work on the ATA controller anymore, just trust that. I need to test the functionality of the ports, especially the 66 MHz PCI one.
I have ( well I had as we will see ) two Radeon 9250 graphics cards in PCI and AGP versions. I did the whole initial installation with the AGP card.
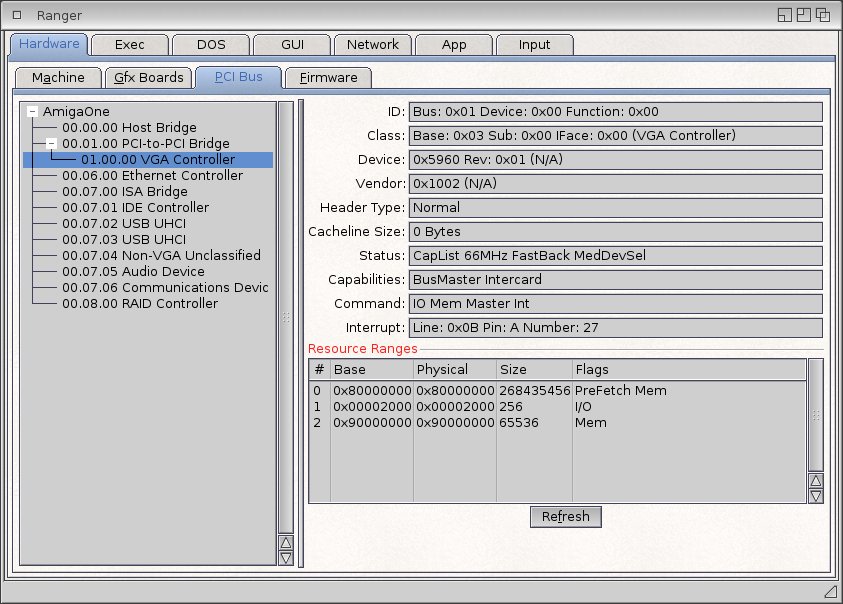
Note the address 01.00.00, this is the first slot on PCI bus 1, i.e. AGP.
Then I replaced it with a PCI graphics card, of course in a PCI 66 MHz slot. In the U-Boot menu you need to set the parameters "Video/Boot from PCI". This is the selection of which card to display the video output of the U-Boot from. So maybe it's not entirely necessary, I read in the comments that if only one card is available, U-Boot will just ingest that one, but it's good practice to set it correctly. ( This menu actually works a little differently, more on that in the next article ).
But you definitely need to set the "PCI/AGP / AGP bridge / AGP Bus off" parameter. This turns on PCI mode.
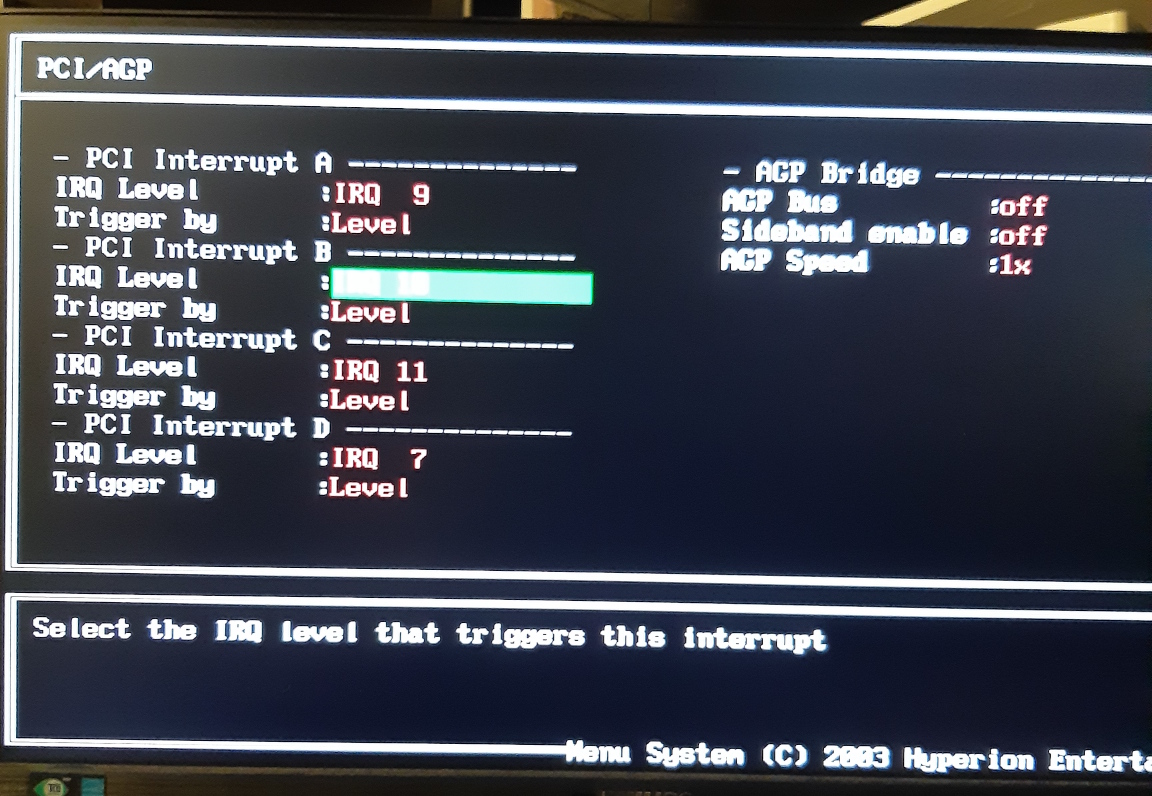
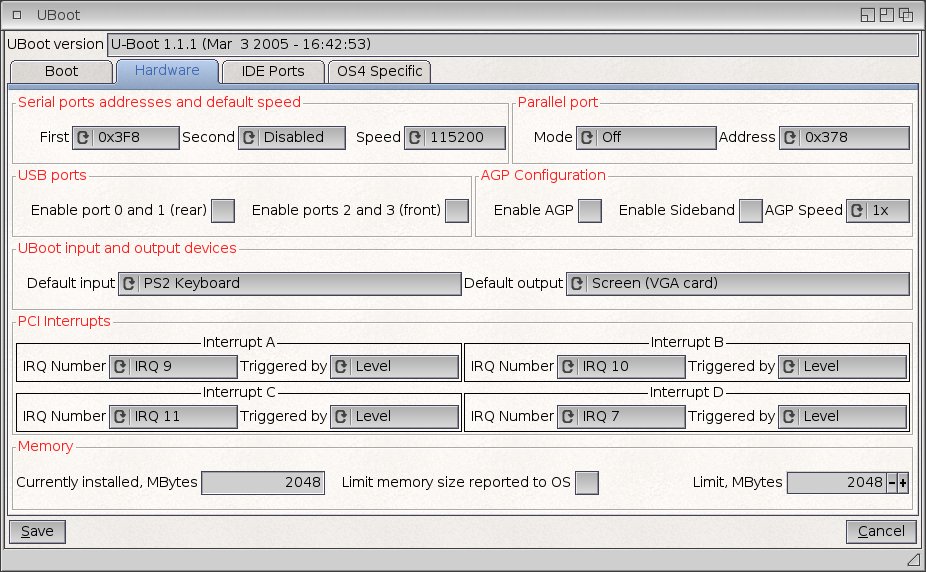
As you can see in the system preferences, the name is a bit different, but it's the same thing.
If you don't do this, you will try to run the PCI card in AGP mode and destroy it. Unfortunately, I was able to do it in the end. Then again, it's only the second destroyed card in all my years of playing with computers, so it's not that bad. For a blonde, of course.
If you make the opposite mistake, i.e. run the AGP card in PCI mode, nothing terrible will happen, it will just be slightly slower.
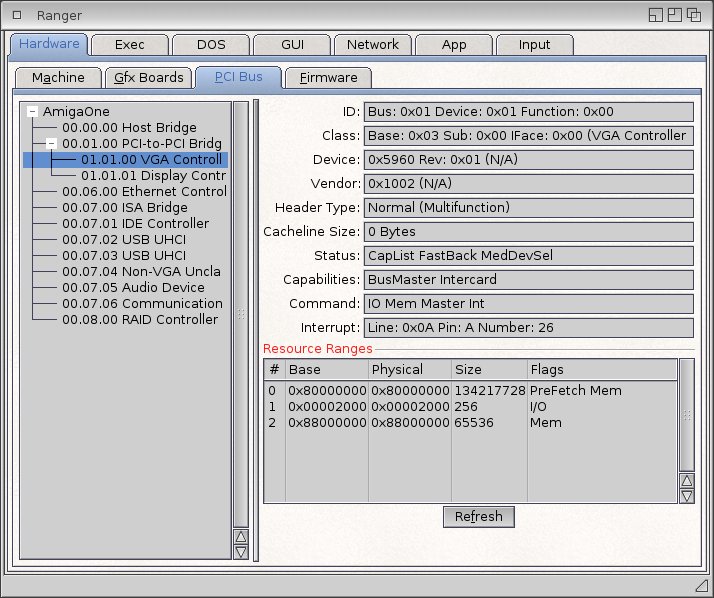
Address 01.01.00 is the second slot on PCI bus 1 , i.e. PCI 66 MHz. Some cards display a Display controller in addition to the VGA controller.
So the PCI 66 MHz slot works! The DMA-unfix was successful.
I tested the VRAM read and write speeds with RageMem and they were quite surprising. AGP card in AGP x2 mode, AGP card in PCI mode and PCI card had exactly the same values! Videobus Read: 29 MB/s, Write: 169 MB/s. Well then I don't trust the RageMem program much in this, it usually gives strange results in general. I usually use gfxbench2D, but it's too complex and takes a long time for quick testing, so I'll measure that too in the next article. It's also possible that we hit a CPU speed limit, because RageMem only measures write speed without DMA. Either way, PCI 66 MHz works great and we can move on to the next one.
I finally installed a Radeon 9000 PRO graphics card into the Amiga. It is the fastest fully supported AGP.
6. PCI 1 GbE NIC
XE has a standard 100 MbE NIC with 3Com 3C920 chip. But our CPU is certainly capable of higher speeds. So I tried a PCI card RTL8169SC - 1 GbE. It didn't work in the third PCI slot - or rather it was seen as working on the PCI bus, but the Amiga got stuck when trying to configure the NIC. Repeatedly. In the second slot, however, everything was set up successfully. Once again, it is confirmed that the Northbridge Articia S is quite sensitive to PCI cards.
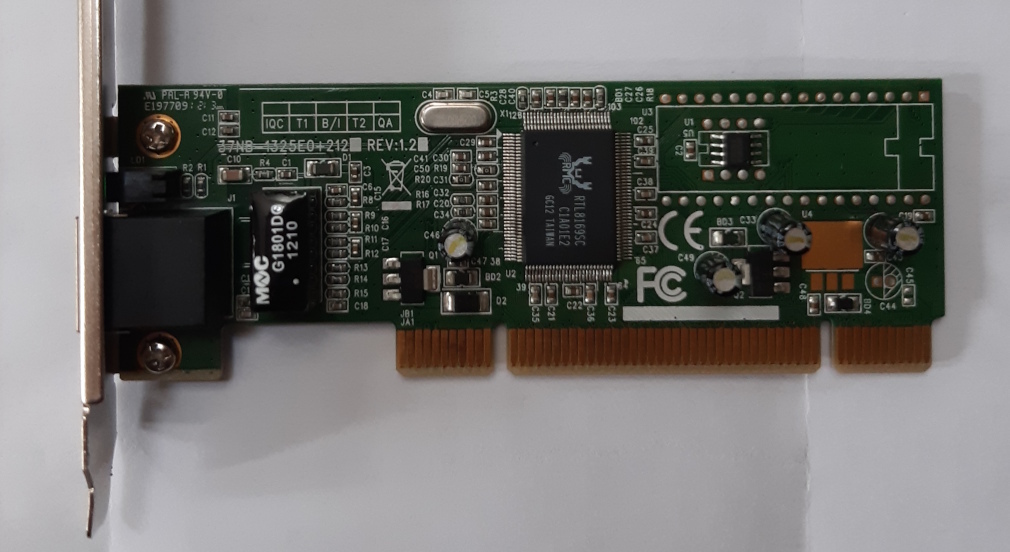
TCPSpeed result: real speed 17 964 kB/s = 140 Mbps. The internal NIC has 91 Mbps, so we have a nice speedup of over 50%.
7. PCI USB 2.0 and the slot magic again
I tried three types of cards with NEC and VIA chips. But in the third slot none of them worked properly.
When I put the card with the NEC D720101G chip in the second slot instead of the 1GbE NIC, it worked properly even in USB 2.0 mode.
So do I have to choose between having a NIC half as fast or a USB several times as fast? No way, I think I'll take the NIC, I only use USB sporadically anyway.
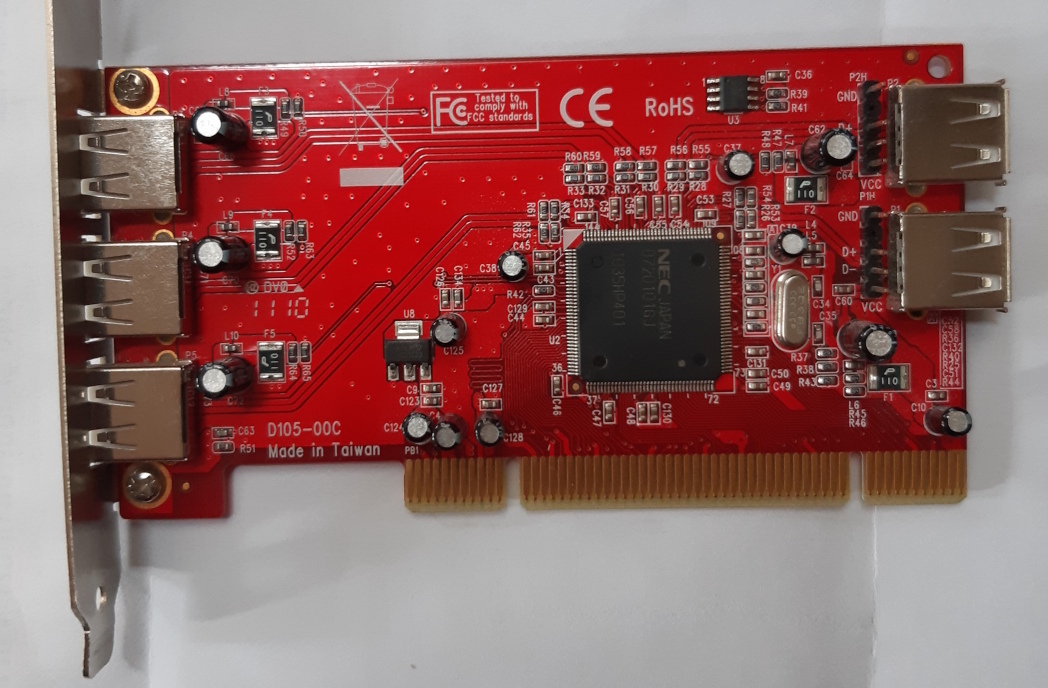
But what if I put the configured PCI NIC card into the third slot? And look! Both 1 GbE and USB 2.0 work. I even tried changing and saving something in the network card preferences and everything was fine, the card rebooted normally. I also checked the Video bus speed, if it didn't decrease like the Pegasos 1 ( they have the same Northbridge ). Speed the same, everything is fine. So hopefully it will hold.
8. CPU overclocking
We have everything installed, all memory, AGP and PCI cards are on place and we can start overclocking. Before that, I'll just measure the temperature on the heatsink under load - it's just over 36°C. The CPU has a maximum of 85°C "on die", so we'll set a maximum for the bottom temperature of the heatsink of 65°C. The difference is partly because the CPU has a slightly higher temperature than the bottom of the heatsink, and partly just to be safe.
And here I have to praise the manufacturer Eyetech for the fact that AmigaOne XE and Micro A1-C has Dip-switches for setting the FSB and CPU or VCore frequency. We don't have to solder anything like with Pegasos 1 and 2 or Mac Mini. And settings are descripted in AmigaOne XE manual.
The FSB ( Front Side Bus ) frequency of my AmigyOne XE is 133 MHz and the initial setting of my CPU and VCore is:
- FSB frequency x6 = 800 MHz, VCore = 1.59 V.
So let's try upping the speed one notch first:
- x6.5 = 866 MHz
Amiga boots up without errors, passes Ragem, but gets stuck at Tower57 game. The temperature at the bottom of the heat sink is 37.5 °C.
So we can still try to increase the VCore voltage to the nominal value of this CPU:
- x6.5 = 866 MHz, VCore = 1.64 V
Everything is fine during testing, with a maximum temperature of 38.5 °C during games and tests.
In particular, nothing crashes, but when running for a long time - for example after a few hours - the Amiga sometimes randomly gets stuck. And because I don't want that, I've reverted everything to the original 800 MHz, 1.59 V state and everything is perfectly stable even when running all day. Yeah, those are the prototype series of processors.
And just a word of caution, when you do the overclocking: Find the specs that match your CPU label exactly. All the letters must match. Even if only XPC7451-RX800 is the same, it's not enough. Those last two letters in the code can make a difference in VCore 1.6 to 1.8 V and in temperature 65 to 105 °C. Enough to destroy the CPU.
9. After installation
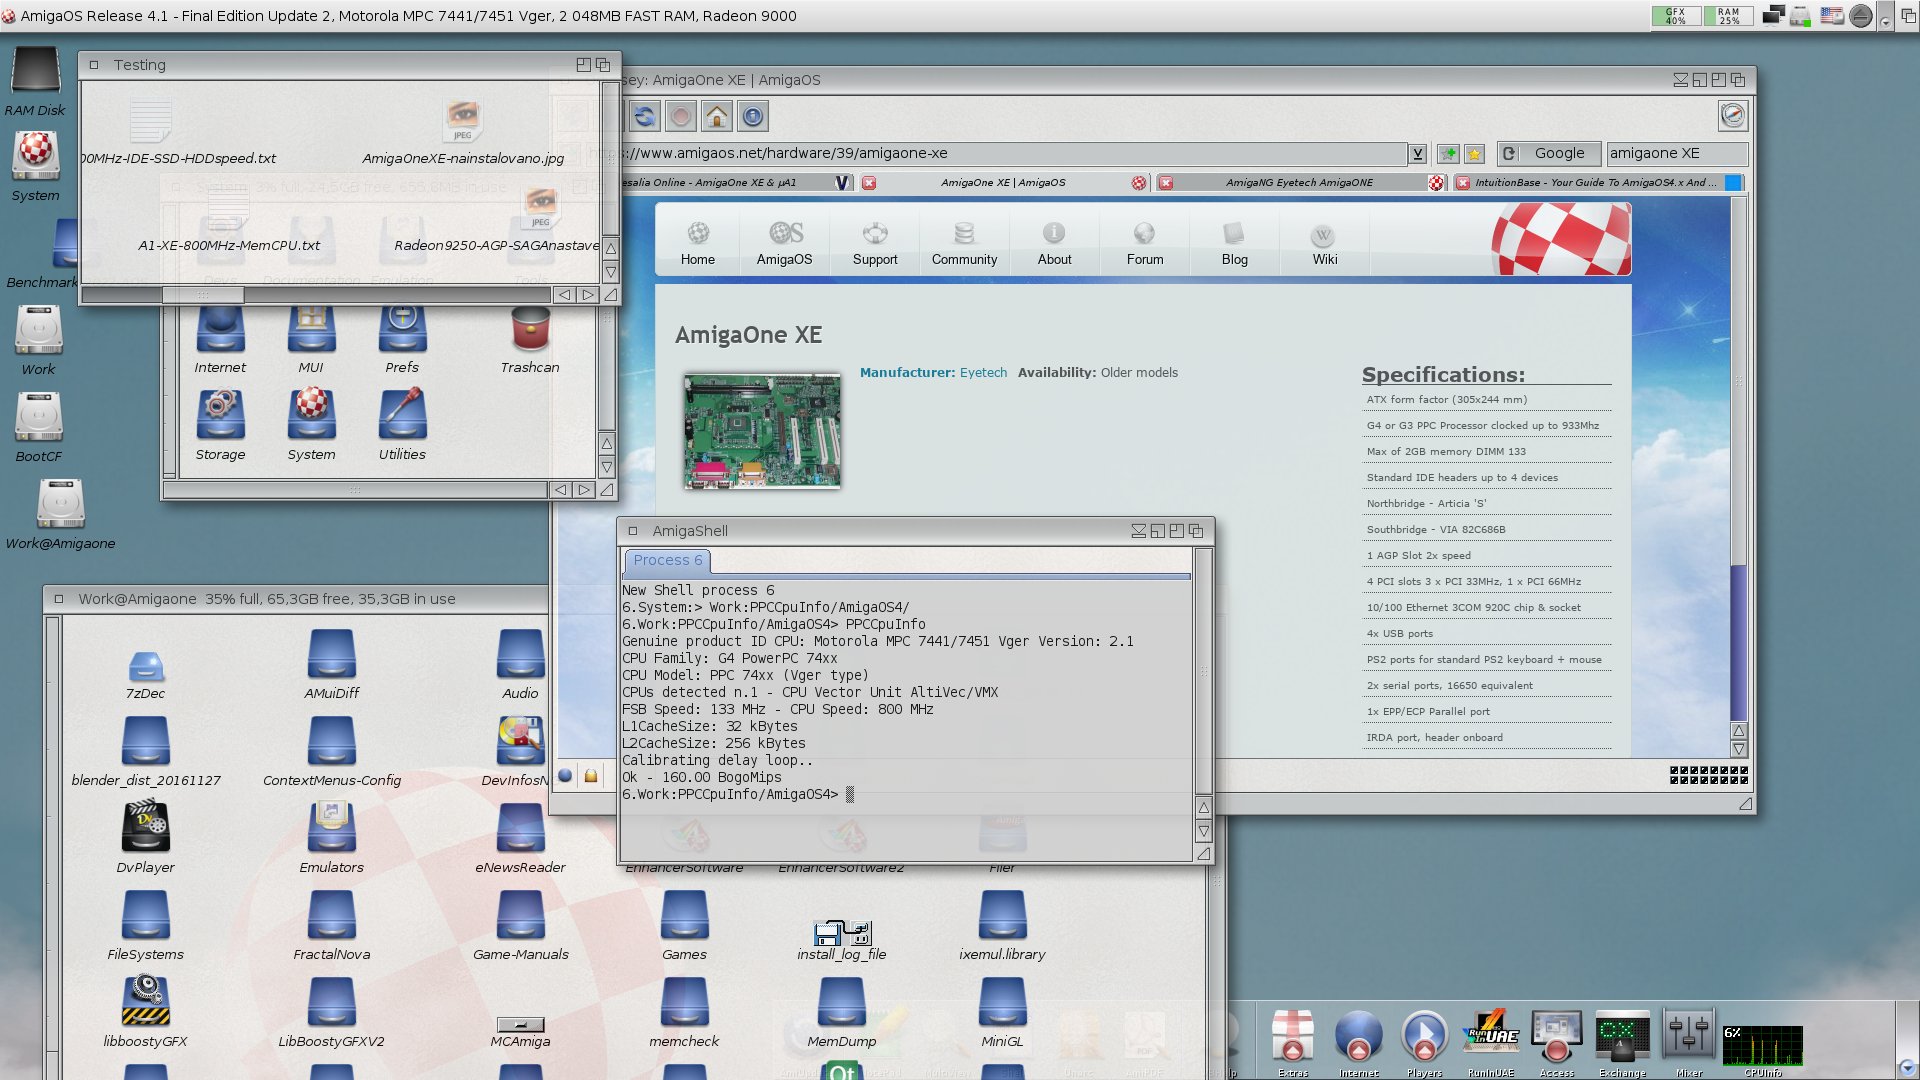
And this is how my Amiga XE looks after installing AmigaOS 4.1 FEu2.
And a little digression, I have to advertise the NetFS program by Philippe Rimauro. If you have several Amigas ( I currently have eleven ) this is an absolute must in my opinion. It is a network filesystem for AmigaOS 3.x, 4.x and MorphOS. Yes, we can of course transfer files via Samba or FTP and the like, but if we are talking about speed, low hw resource requirements or ease of setup and use, it has no competition in my opinion.
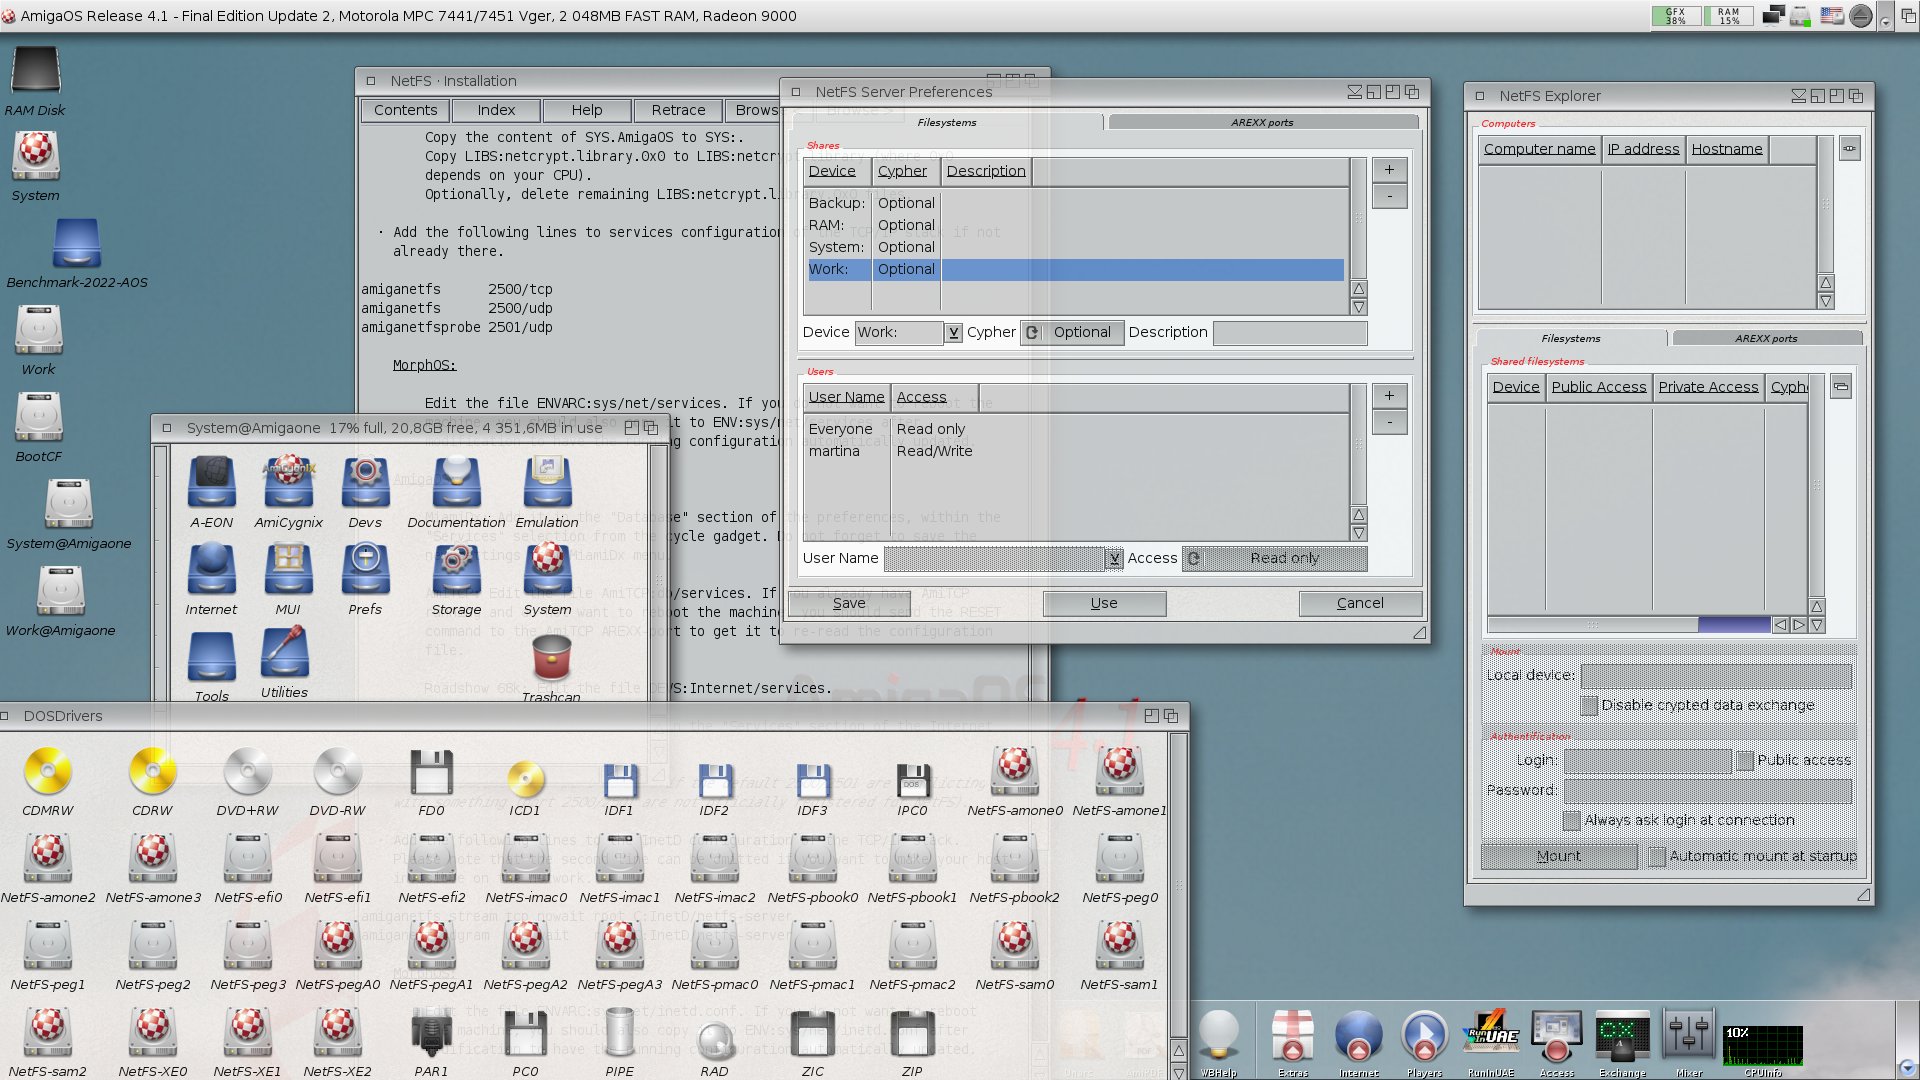
In the window at the top middle is the NetFS server preferences - i.e. the disks you want to share and the allowed users. You can also force traffic encryption, but I don't use it because of slower machines like the Efika and Pegasos 1. Then in the right window is NetFS Explorer for easily discovering and mounting other NetFS devices on the network. This is also where NetFS's one little quirk becomes apparent - it only has native binaries for AmigaOS 3.x and MorphOS, not AmigaOS 4.x. So in AmigaOS 4.x we use the m68k version and Explorer doesn't work correctly, so I have to use an alternative mounting method. And you can see it on the bottom left - I have individual configurations for each network drive in Sys:Storage/DOSDrivers. Everything that starts with "NetFS-" ( and now I see I don't have little Sam440ep, Micro A1-C and Pegasos 1 there yet ). Anyway, just double click and it's mounted. On the Workbench desktop on left you can see the mounted disks from the AmigaOne X1000.
NetFS is usually the first thing I install on a clean system to avoid flash drives and more. Plus, I have a ready configuration with all the files set up for AmigaOS and MorphOS, so I just copy it to SYS: and don't have to manually install anything.
Conclusion
I have to say that I am really very satisfied with AmigaOne XE. If you take a little bit of trouble with the initial configuration of disks and cards, the Amiga is stable and everything works beautifully. Which is a good thing, because PCI cards greatly increase the capabilities of the already old hardware.
It's a bit of a shame that AmigaOS 4.1fe only supports Radeon 9xxx cards with the R200 chip. Hyperion's support for R300 ( Radeon 9500-9800 ) chips would greatly improve performance in games. The Radeon 9800 PRO card is more than twice as powerful as the Radeon 9000 PRO and is the most powerful card ever to fit into our AGP ports.
Compared to its competitor at the time, the Pegasos 2, the AmigaOne XE is a worthy rival, but still a bit slower. Not only because the G4 CPU supplied with the Pegasos 2 is capable of more overclocking, but Pegasos 2 also has a far better Northbridge. Where the AmigaOne XE has an advantage, on the other hand, is the PCI 66 MHz slot, working 2 GB RAM and sometimes the ability to boot directly from SATA drives.
I can definitely recommend AmigaOne XE. It is definitely a better choice than Micro A1-C or small Sam440ep. Anyway, I can see that this AmigaOne XE will be my favorite machine for AmigaOS 4 without Enhancer.
"Some other time" ( ... it a also song by old Czech group Katapult ) I'll write about testing a modern PCIe Radeon HD7xxx graphics card with A-Eon's RadeonHD driver, like I used to on Sam440ep-flex. But I won't install a RadeonHD card in the Amiga XE permanently. Especially because I already have two other Amiga NGs for modern applications. And also because using PCIe RadeonHD cards on the AmigaOne XE is far from ideal, as we will see.
Special thanks to:
Paul for AmigaOne XE
walkero and helloworld for the DMA-fix and USB-fix documentation
my colleague for the DMA-unfix
logos are from amigang.com and mrhardwarecomputers.com
picture of DMA-fix from Eyetech manual