This article was originally published on amigaportal.cz in March 2023.
1. What's next for XE?
I have written three articles about my AmigaOne XE, which is the most so far. Not surprisingly, the XE has been on testbed for a year and there has been quite a lot to test and explore, as there is a lot that doesn't work on OOTB. Anyway, since I've given it so much time, it would be a shame to only turn it on occasionally, or even shelve it. It's just that to do anything reasonable with an NG Amiga nowadays ( like browsing modern web pages ), you need a CPU performance of at least 1.2 GHz or more with AmigaOS 4 or MorphOS. So I decided that even though the original 7451 / 800 MHz CPU works fine, I would still take a chance and replace it with a faster one. My XE deserves to be turned on more often than occasionally.
2. Choosing the right CPU
But first you need to find a suitable CPU. But which one? The original G4 CPU is type 7451 and has an interface for L3 cache. This means that it has 483 pins, i.e. balls ( 483 BGA case ) and it is therefore easiest to replace it again with a 483 BGA type. Next, we are looking for a CPU with a frequency above 1.2 GHz. Replacing a CPU is always a bit of a risk, so it's not worth risking it for the sake of a performance increase to, for example, only 1.0 GHz.
This unfortunately limits us a bit, as with frequencies above 1.2 GHz, the G4 CPUs with 360 BGA case ( without L3 cache, MPC 7445 and 7447 ) are much more affordable. These CPUs could theoretically be used, the pins are functionally identical except for the L3 interface, but it would require a interposer reduction that would have to be designed and manufactured by someone. I can't do it. Then we don't have to worry about not having L3 cache, AmigaOS 4 on AmigaOne doesn't use L3 cache anyway because of the cache coherency problem with Northbridge.
So if we stick with 483 BGA, we have a choice of MPC 7455 and 7457 CPUs. Since the MPC7455 manual says "The MPC7455 is footprint-compatible with the MPC7450 and MPC7451" and the MPC7457 manual says "Note that the MPC7457 is a footprint-compatible, drop-in replacement in a MPC7455" So both should work as analogous replacements for the original 7451 CPU.
Unfortunately 7455 and 7457 CPUs are rarely sold separately with frequencies above 1.2 GHz, so it is easiest to cannibalize old Powermacs or their turbo cards. The 7455 type can be found in the Mac Server G4, XServe G4 and Powermac G4, or in the Giga Design, Mercury Extreme, Power Force and Sonnet Encore turbo cards. Type 7457 is only available in turbo cards.

If you can find one, I recommend the MPC 7457 type, it has double the L2 cache ( 512 kB ) and although it has a maximum type frequency of only 1267 MHz, it can generally be overclocked higher than the 7455 type.
But I couldn't find a reasonably priced 7457, so I got a cheap CPU card for a Powermac G4 1.42 DP with two 7455 processors clocked at 1420 MHz.
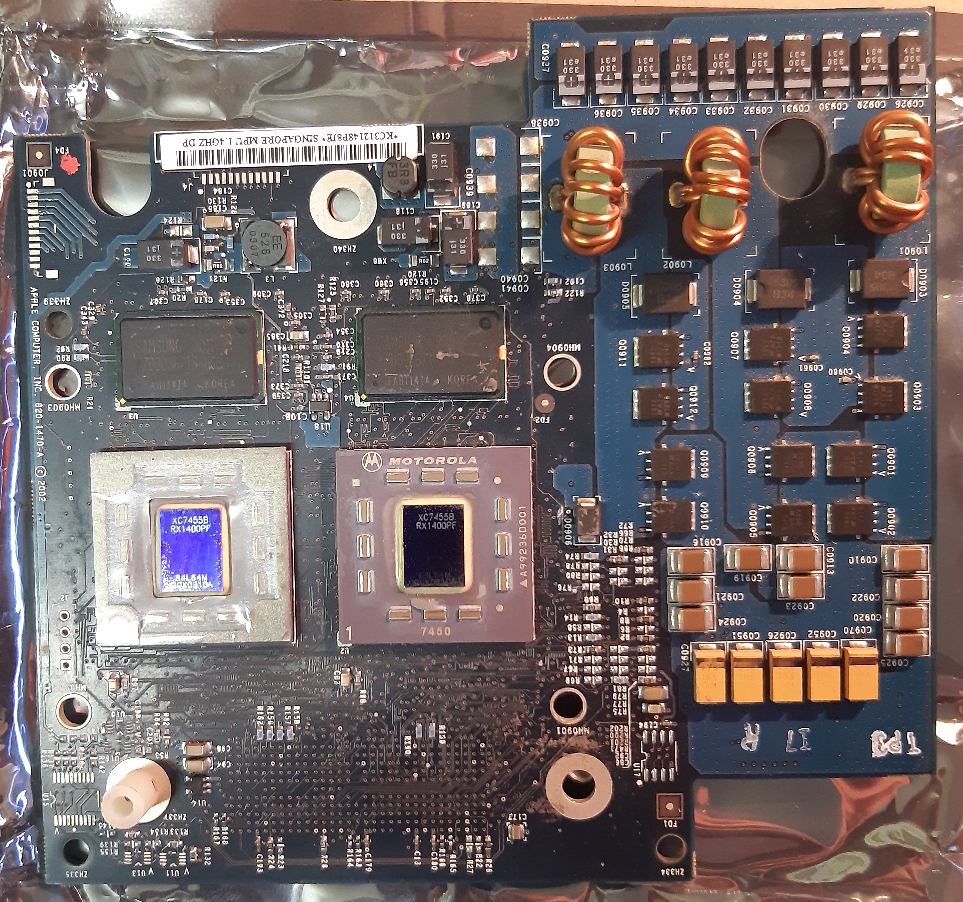
And this is what the CPU card looks like. The exact designation of the processors is XC7455B RX1400PF. 1400 MHz frequency is sufficient, unfortunately again as with my original processor it is a "Pilot Production Prototype", VCore 1.6 V +/- 0.05 V and only 65°C maximum temperature. So we will have to be careful with overclocking.
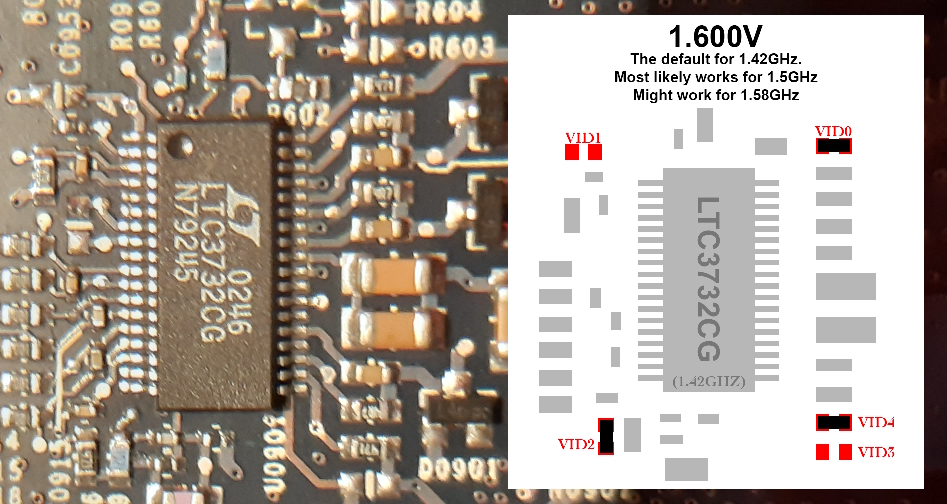
Although we have the catalog information of the new CPU, if possible I recommend to check the current VCore settings directly on the Powermac CPU board. For my card, for example, we can find the data here: https://thehouseofmoth.com/ppc-overclocking-station/#MDDdual. If you have a card not listed here, you'll have to do some digging.
3. Setting higher CPU frequencies
If we look carefully at the AmigaOne XE CPU card and then at the CPU documentation, we run into one minor problem.
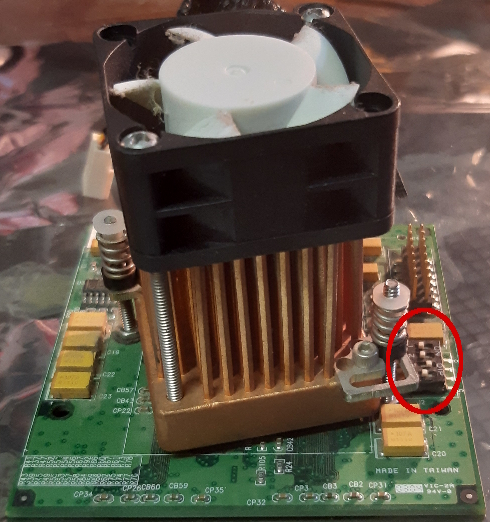
As you can see on the CPU board only four pins are brought out on the dip-switch to set the frequency ( CPU pins PLL_CFG 0:3 ) and signal PLL_CFG 4 is permanently set to "0". However, only frequencies up to 1133 MHz can be continuously set in this way, and then two higher ones - 1267 and 1533 MHz ( see table in chapter 5 ). Other frequencies need the fifth pin set to PLL_CFG 4 = "1". So does my frequency, 1400 MHz.
We can leave it as it is and take the risk that the CPU will overclock to 1533 MHz, but in case it won't overclock, we have to stay at 1267 MHz, which is almost a pity with my 1400 MHz CPU. If my new CPU was already a serial MPC with higher temperatures, I would take the risk. But with the XC design, I have to assume that 1533 MHz won't do.
So what now? We need to find and correctly connect the fifth configuration pin, PLL_CFG 4. It's very easy to find, according to the CPU manual it's pin H8. We don't even have to look too hard to see where the pin is on the CPU board. On Amigaworld.net or a1k.org we find that pin H8 is connected to resistor R13 ( 1500 Ohm ) on the bottom of the CPU board.
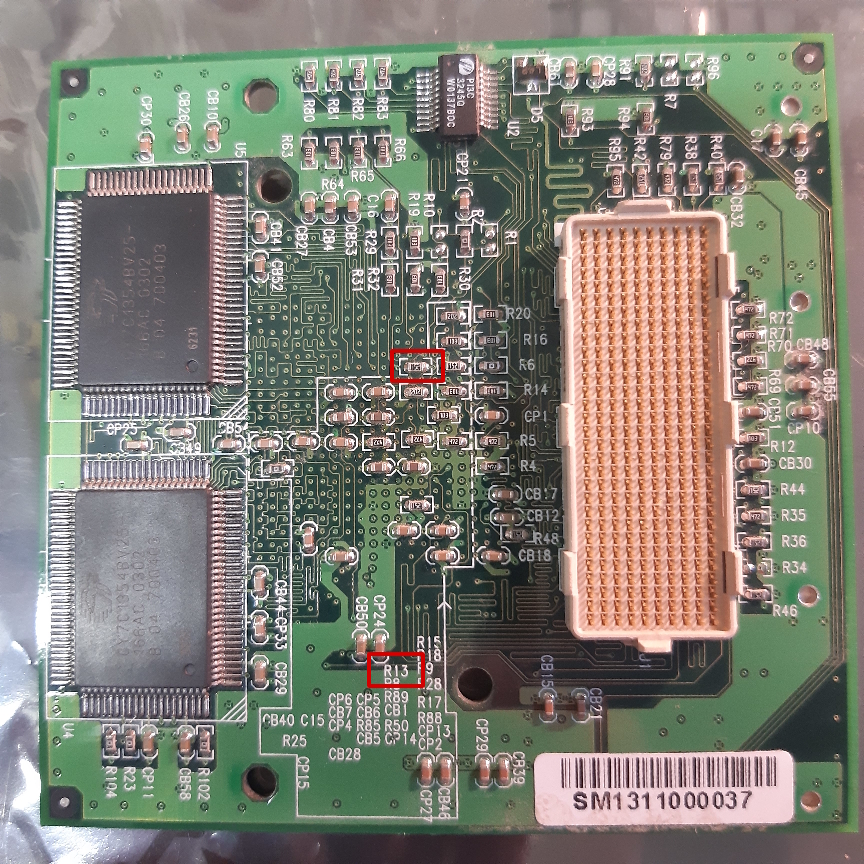
And on the same forums we can read that it is enough to remove resistor R13 and we can achieve the setting PLL_CFG 4 = "1".
4. Replacing the CPU
So go ahead. As you know, I can't do much of that myself. And replacing and reballing CPUs is something like the realm of science fiction for me. So I again used the services of my already favorite company Megafix.cz ( they really deserve this advertising for the prices and quality) and the next day it was done. CPU replacement and R13 removal.
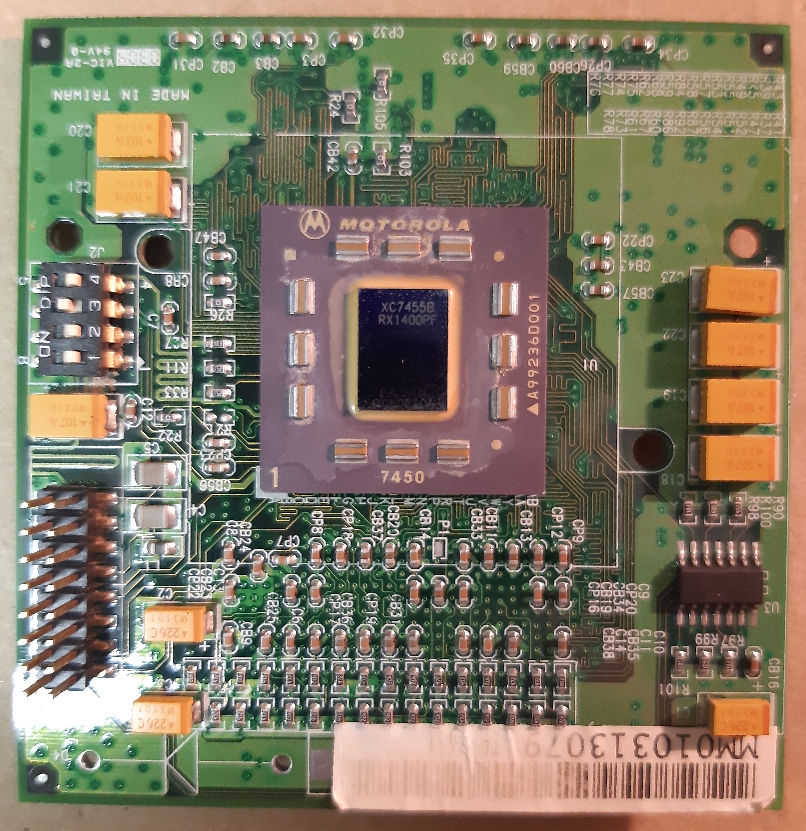
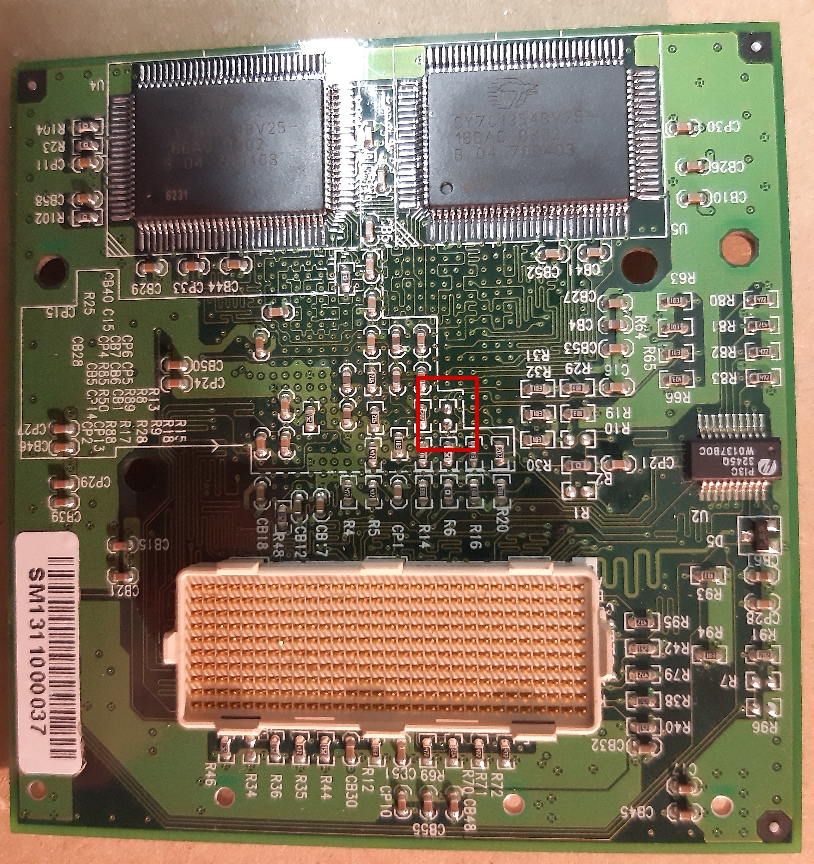
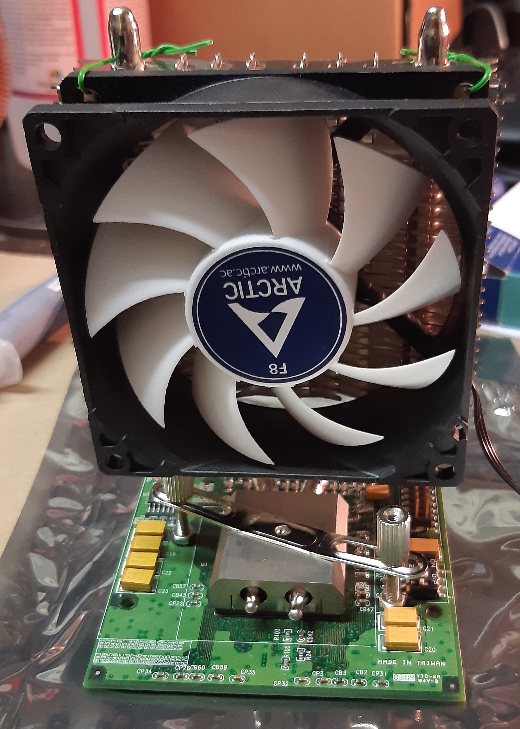
Before we start testing, it is necessary to set the values according to the new CPU: the VCore on the motherboard to 1.59V and the frequency on the CPU board to 1400 MHz. The data on how to set VCore are in the AmigaOne XE manual, so I do not list them here. Next, we need to equip the CPU with a better cooler. I used a Thermalright HR-05 SLI ( I used to have it in Pegasos 2 ), an Arctic F8 80x20mm fan and Arctic MX-4 heat conductive paste.
5. First tests
This is how the complete frequency settings for the G4 CPU look like for FSB 133 MHz:
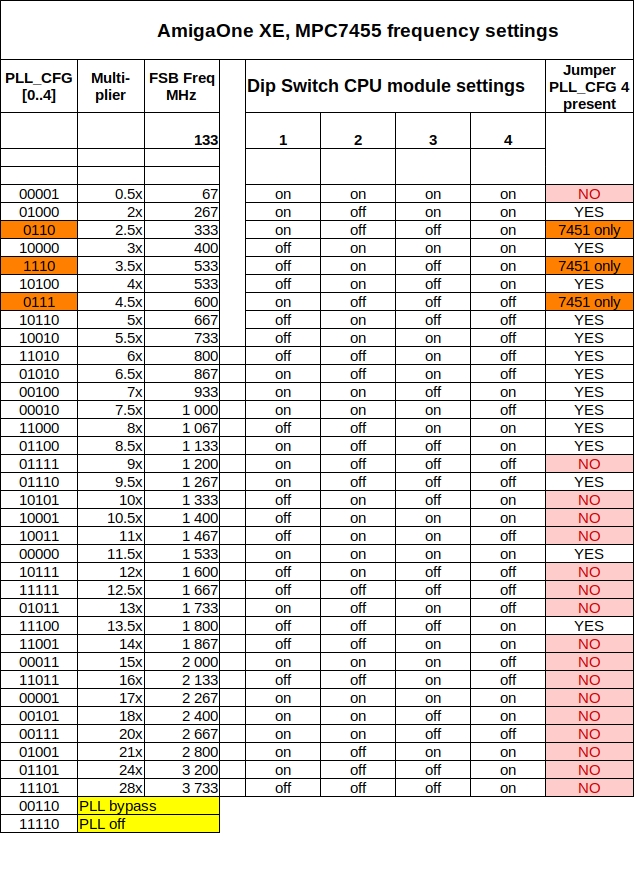
There are a few things to note in the table. The field labeled "7451 only" with four defined signals was used this way only for setting up the 7440, 7451, 7450 and 7451 CPUs. For all newer versions of the CPU, the configuration is already extended to five signals and has a different meaning. The "YES" fields mean the default configuration of the CPU board, i.e. resistor R13 is fitted ( PLL_CFG 4="0" ). The red "NO" fields mean resistor R13 is removed ( CFG_PLL 4="1" ).
After setting 1400 MHz ( dip-switch: off, on, on, on + removed R13 ) and turning it on, this is what I saw:
( Please excuse the poor quality of the photos, at this stage of testing I don't want to take proper photos of anything, it's very time consuming, there are sometimes dozens of tests. And I don't want to take screenshots at all, it delays even more. )
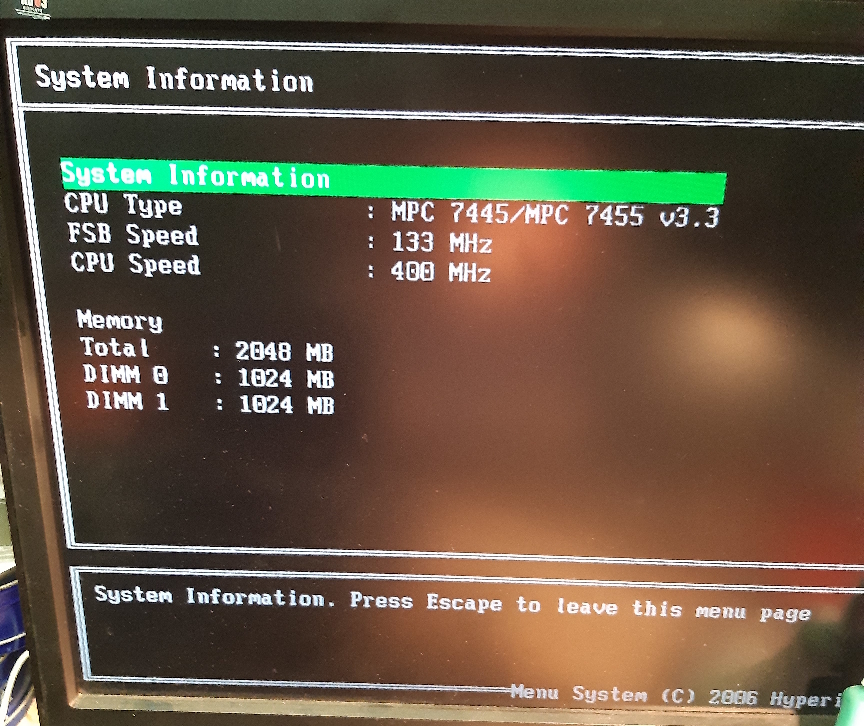
Even the system speed was noticeably lower, so we are unfortunately at only 400 MHz. So at a frequency corresponding to the off, on, on, on + R13 setting in place.
Another test with the 1467 MHz setting yielded a real frequency of 733 MHz. Again, these values differ only by the R13 setting.
So there is obviously something wrong with the setting of PLL_CFG 4. Even if R13 is removed, frequencies with PLL_CFG 4 = "1" behave as if PLL_CFG 4 = "0" is set.
So let's try a frequency that is valid only for PLL_CFG 4 = "0", i.e. as if R13 was fitted.
Let's try the 1533 MHz. Only - black screen. Could my CPU not handle that frequency?
Note: yes, I should have serialdebug attached and you should definitely do that. But I tested in the basement and there's nothing to connect to. However, even basic optical diagnostics using a black screen indicates that something is probably wrong.
Another test for the expected frequency of 1067 MHz, but again a black screen. So it's not a high frequency.
So let's summarize the first part of the tests: FAILURE.
Only one thing separates us from total failure - the new CPU obviously works and is probably soldered well.
The settings I thought had PLL_CFG 4 = "1" behave as if PLL_CFG 4 = "0".
Settings that have a valid value for PLL_CFG 4 = "0" generate a black screen.
The only conclusion is that removing R13 did not cause the PLL_CFG 4 signal to be set correctly, but left it in an undefined state. So the information on the forums about removing R13 is not true. So it is a fact that it is written there only in theory, nobody has confirmed it in practice.
So you will need to wire pin H8 correctly, using a pull-up or pull-down resistor as per the CPU manual.
6. Searching for new PLL_CFG 4 wiring
The ideal would be to find out how exactly the PLL_CFG 0:3 signals are connected to the dip-switch. But the documentation of the CPU board is not available, I can't find it on the multilayer PCB, so I asked around on forums and colleagues.
A bit of a problem was that almost nobody had ever clocked the AmigaOne XE this way. Evillord68 from a1k.org has a CPU 7457 at 1533 MHz and it shows the correct value, but there R13 stays in place. All other published clock speeds are at 1267 MHz or less.
The search took a long time, but luckily Sven Grosse, a colleague from Germany, helped me. He doesn't mention it on the forums, but he has an AmigaOne XE on 1400 MHz. He sent me this wiring diagram:
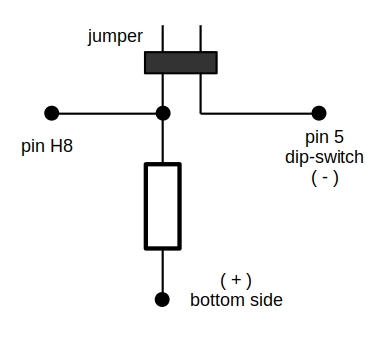
Thank you very much again Sven! I hope I wasn't too annoying.
So I bought a resistor and a jumper and asked my work colleague again if he would solder it for me.
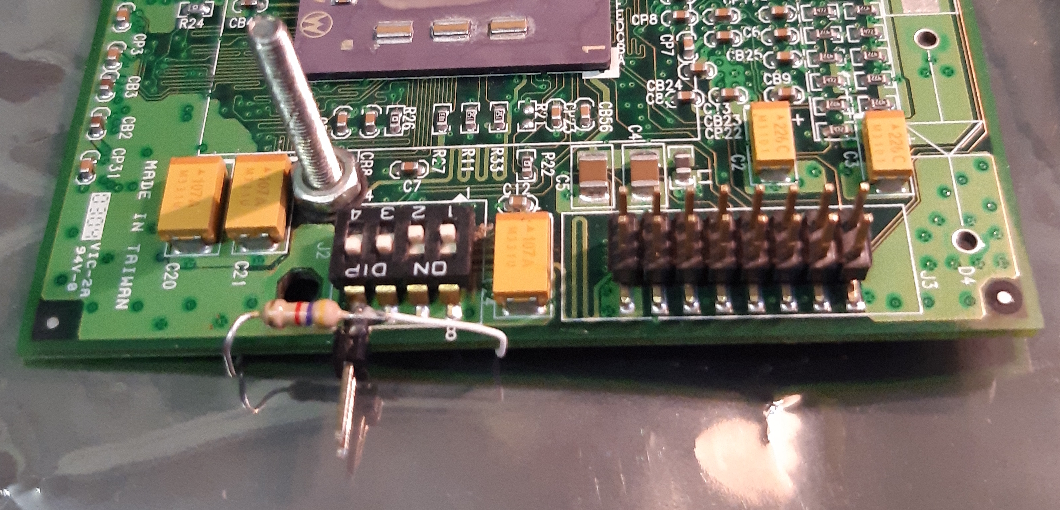
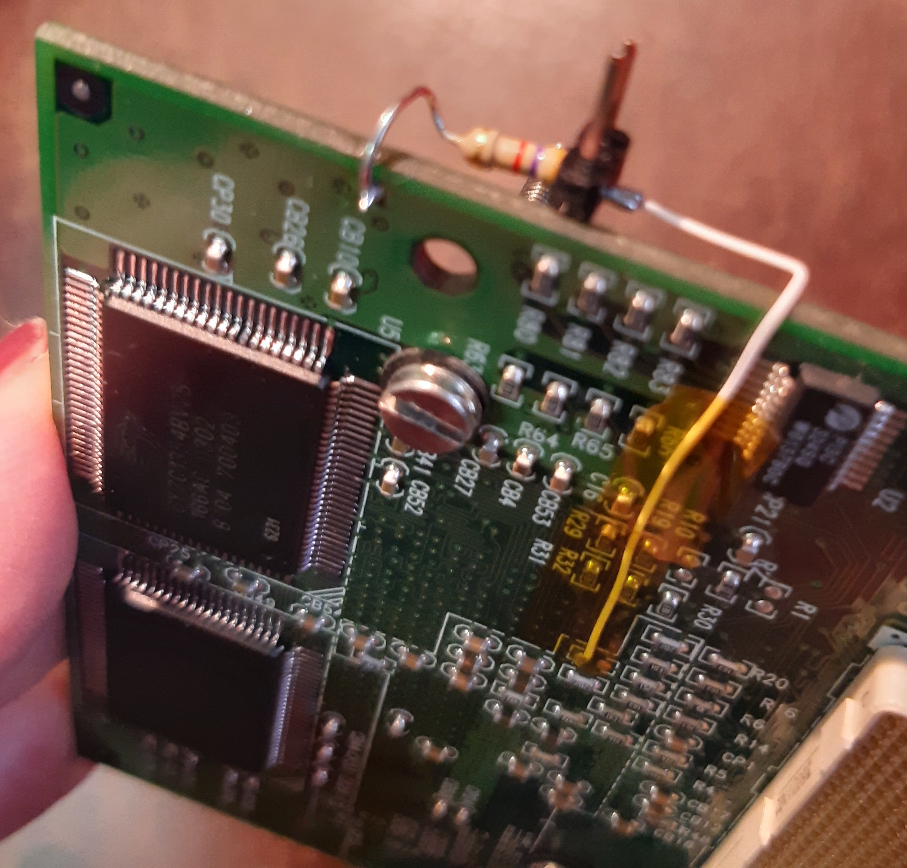
And this is what it looks like. Some would call it "crazy with resistor", but I'm glad I got it and the very next weekend I tried it with no resistance at all.
7. Tests No.2
Look again at the CPU frequency settings table in Chapter 5. This time the "YES" fields mean the jumper is fitted ( PLL_CFG 4="0" ). The red "NO" fields mean the jumper is removed ( CFG_PLL 4="1" ).
First I tried the setting for 1400 MHz ( off, on, on, no jumper ), the nominal value of the new CPU. To my disappointment, the 400 MHz frequency appeared again in U-Boot and in the system as it did the first time. But the system runtime was very fast and indicated that it was not 400 MHz.
A quick GLQuake test showed that the FPS increased to 89.7 from the original 68.3 at 800 Mhz. And Dhrystone1 increased to 996 from 588 DMIPS. So great.
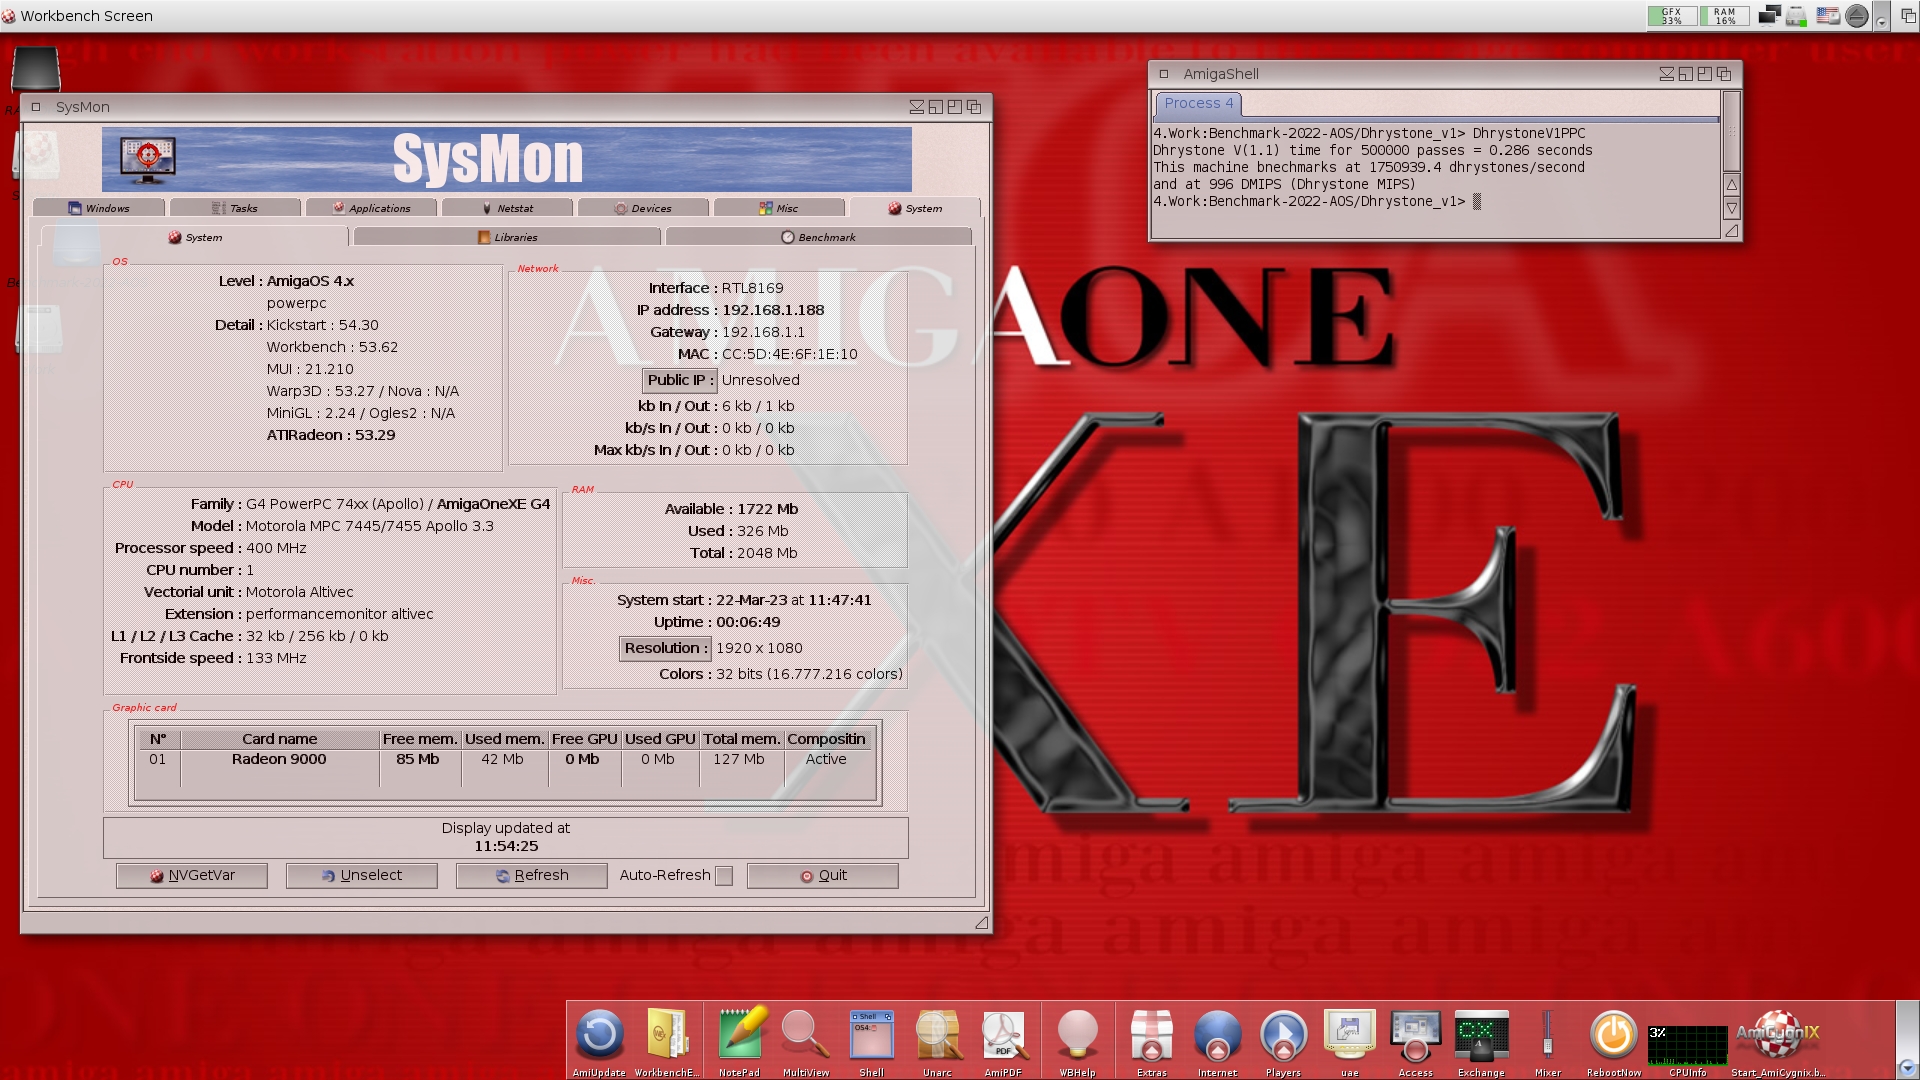
To check, I also changed the jumper settings ( off, on, on, with jumper ). The U-Boot and system are back to 400 MHz, which is correct this time. But Dhrystone1 only 285 DMIPS says that this time it is 400 MHz real.
The 1533 MHz setting ( on, on, on, on, with jumper ) works, but the system shows only 66 MHz. Never mind, it runs fast - 1110 DMIPS.
Importantly, the temperature of the CPU heatsink base was kept within 36°C during testing and full load. That's a maximum of 46°C on the CPU, so plenty of margin.
So let's summarize the second part of the tests: SUCCESS.
Not quite 100%, a bit spoiled by poorly displayed higher frequencies, but the purpose was achieved: an AmigaOne XE with a fast CPU! Welcome back to the big world!
8. And my favorite charts.
However, before I proceeded to benchmarks and graphs, I finally took the XE off the testbed and mounted it in a Sharkoon VG7 ATX case. And it now lives on the shelf where it took the place of the Sam440ep-flex. Not because the XE was more important, but because Sam's case was right-handed and opened up to the wall which wasn't very practical. So Sam ended up under the desk, but with it already opening to the right side. I just need to get him a pad to keep him from drowning in dust.
And I have to reiterate the magic of XE with PCI cards. After I removed the cards and put them back in the case, the problems with the PCI NIC card showed up again - stuttering or complete non-functionality. Again, it had to be reconfigured in the second 33 MHz PCI slot and then reseated in the third.
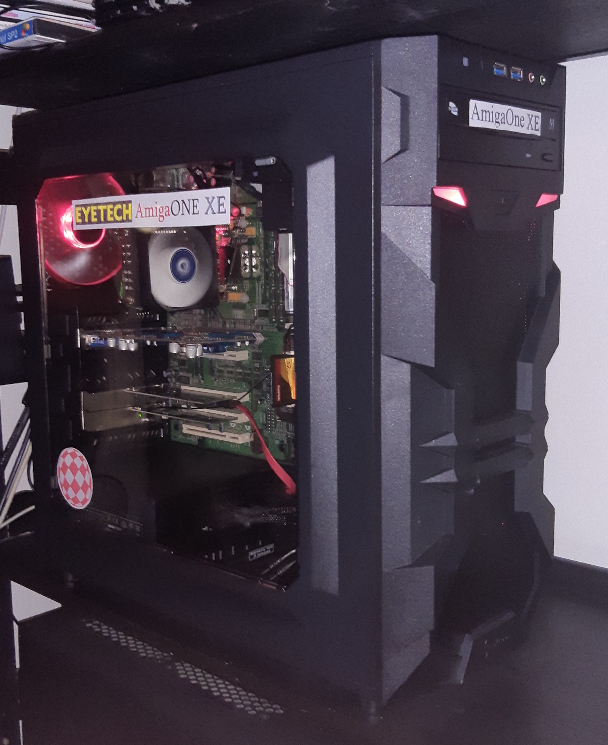
For speed comparison I will use besides XE on original 800 MHz also Micro A1-C, a computer with almost identical design and time of creation and also Pegasos 2 to make Prober happy. Pegasos 2 was missing in comparison of Mini Amigas. But seriously, I would have put it here anyway.
Micro A1-C: G3 866 MHz, Radeon 7000, PCI: SATA I ( SiI 3512 )
AmigaONE XE: G4 800 MHz, Radeon 9000 Pro, PCI: SATA I ( SiI 3114 ), USB 2.0, 1GbE NIC
AmigaONE XE: G4 1400 MHz, Hercules 3D Prophet 9000 Pro, PCI: SATA I ( SiI 3114 ), USB 2.0, 1GbE NIC
Pegasos 2: G4 1333 MHz, Radeon 9000 Pro, PCI: SATA I ( SiI 3114 ), USB 2.0, SoundBlaster
All computers are running AmigaOS 4.1 Final Edition. And all tests will be identical to those in the article "Mini AmigaNG - Volume IV, Final Comparison", for easier comparison. ( Note: these articles not published yet on intuitionbase.com, originals are on amigaportal.cz )
You may have noticed that I don't have an AmigaOne XE at 1533 MHz in my test. It would work. It's just that when running, for example, the Odyssey browser for a longer time, random freezes occur ( even with VCore increased to 1.64 V ). The same with 1466 MHz. So for tests and real life I left the frequency "only" 1400 MHz. Here the XE is stable. Just one more non-overclockable CPU "Pilot Production Prototype". My XE has some luck with them. But no matter, this pilot is at least significantly faster than the original one. You'll see how much more in a moment.
8.1 CPU speed without FPU and VMX
Tested with Dhrystone 1 from the WhetDhryStone package.
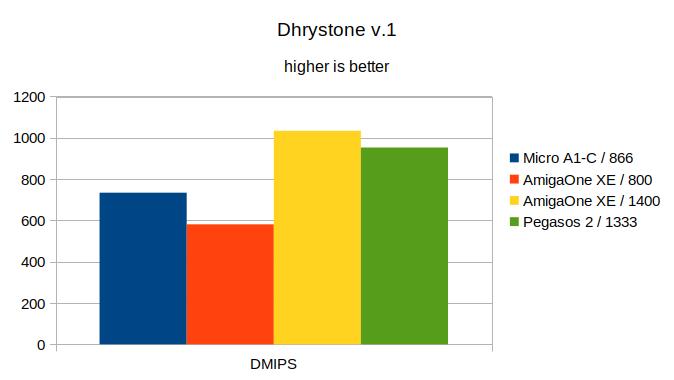
Raw CPU performance is shown here completely prescriptive by frequency, the XE with the highest frequency is the fastest, overclocking has made a significant impact. But unfortunatelly, this is the first of only two wins the XE gets over the Pegasos 2. Because it's not all about CPU frequency.
8.2 CPU speed including VMX
Tested with lame, G3 without AltiVec, G4 with VMX ( AltiVec ).
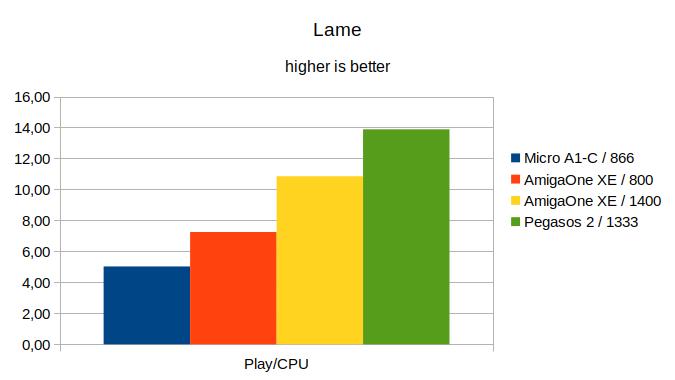
The Pegasos is already the fastest in this task although overclocking of XE has greatly increased it's performance. But the consolation for the XE may be that it beats the Mac Mini G4 / 1.83 GHz by a tiny bit. Admittedly this is mainly due to the fact that the lame for MorphOS doesn't use AltiVec, but that counts too. And with the Micro result with the G3 processor, we can see what an advantage AltiVec provides. Even an unoverclocked XE at a lower frequency is faster.
8.3 memory speed
Tested with Stream.
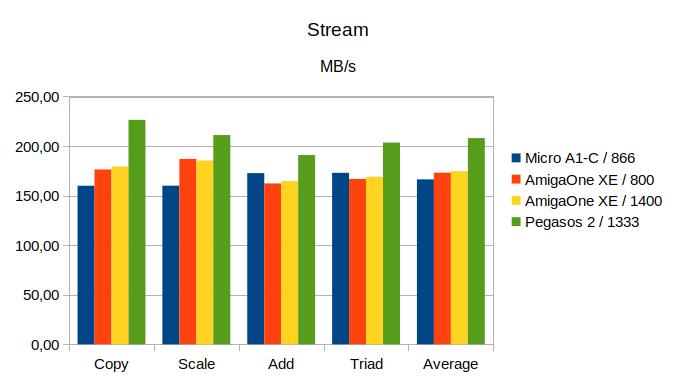
Micro and XE have SDR-133 memory, Pegasos 2 has DDR-266. So it should be almost twice as fast, but it's not. Overclocking of XE does not change the speed of the RAM, the FSB bus frequency remains at 133 MHz.
8.4 Video RAM speed
Video memory write speed is measured using GfxBench2D.
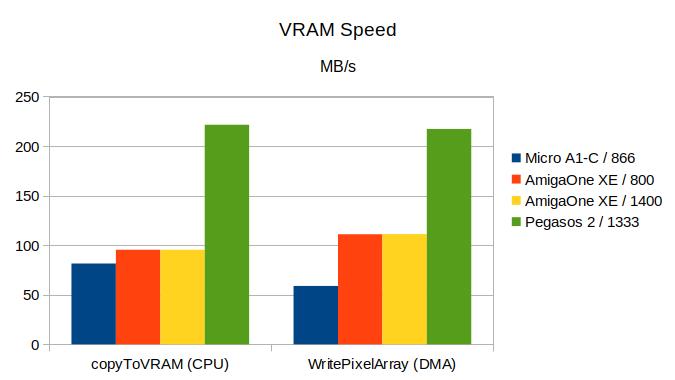
The XE here ( especially with DMA ) is significantly faster than the Micro, which has the disadvantage of an older generation graphics card. Pegasos 2 is twice as fast as XE. This is due to the fact that the PCI / AGP bus controller in both the Micro and XE ( Articia S ) is not well designed. Even though the Articia S has a theoretical AGP x2 speed ( 512 MB/s ), its internal design does not allow real transfers faster than PCI 33 MHz ( 133 MB/s ). From this point of view, the XE is actually at the maximum possible here - again we see that increasing the frequency has no effect, there is simply no more to go through the bus.
8.5 SSD speeds
Tested with SCSISpeed ( bus ) and DiskSpeed ( disk subsystem including cache ), all computers have a PCI controller SATA 150 and SATA SSD. I do not use or test internal IDE anywhere.
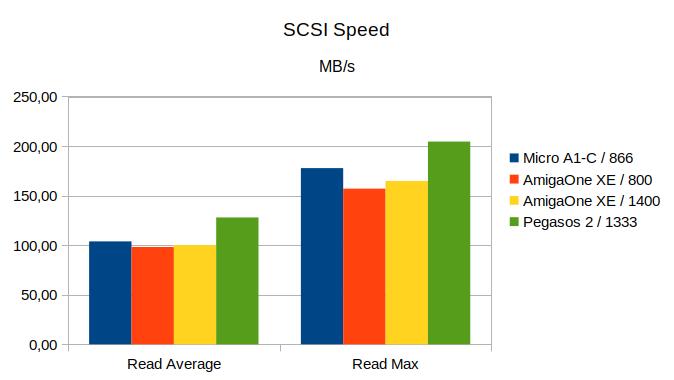
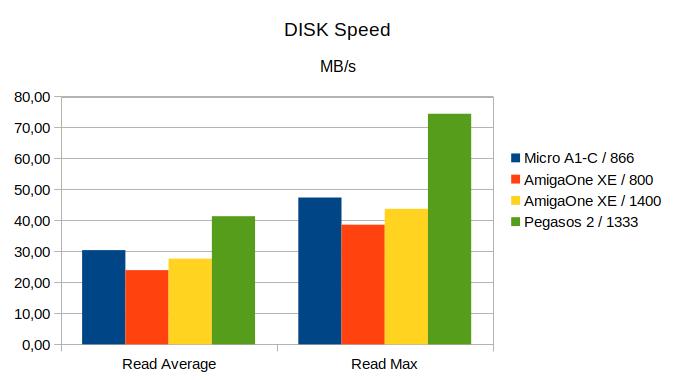
The overclocking has made an impact, but not as much as I expected.
But there are a few interesting things:
The Micro is faster than the XE. Would the SiI 3512 controller be faster than the SiI 3114 ( and therefore probably faster than the SiI 3112 )? It's a more modern version and replacement of the 3112, so it's possible. I'll have to test it properly, and if so, I'll limit the number of drives in the Pegasos to two and fit SiI 3512 controllers everywhere.
Further, if you look up my earlier article on overclocking the Mac Mini ( Note: again, not yet here on intuitionbase.com ), the Pegasos 2 was slower in the drive test. It's just that it was tested with MophOS back then. Here it is tested with AmigaOS, and in three out of four cases it is faster than the Mac Mini / 1.83 GHz ( DiskSpeed read average, SCSISpeed read max and average ). Thus, Pegasos 2 disk is faster with AmigaOS than with MorphOS - this is due to the fact that sata.device in MorphOS can only set UDMA 5 mode ( Ultra ATA 100 ), whereas sii3114ide.device in AmigaOS can set UDMA 6 ( Ultra ATA 133 ) and as a bonus it can also do S.M.A.R.T.
8.6 Ethernet speed
Measured by TCPSpeed against a fast Windows workstation. This can be considered the actual maximum speed of the TCP stack.
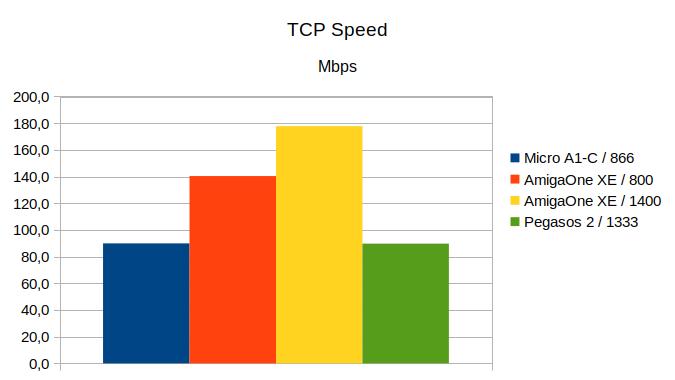
Overclocking increased the maximum TCP stack speed from 140 to 178 Mbps. Perfect. And XE is the fastest.
I don't count this victory over Pegasos 2 though, it's a bit unfair. The XE has an RTL8169 PCI 1GbE card in the test, whereas the Pegasos only has an internal 100 MbE. The Pegasos 2 actually still has an internal 1 GbE NIC ( I use it in MorphOS and Linux ) and therefore does not have a PCI 1 GbE card. But for this NIC AmigaOS still does not have a driver, so the measurement was done with a second internal 100 MbE NIC. I just didn't want to change 2 cards in the Pegasos.
And of course, the TCP stack in XE is almost twice as fast as in Mac Mini and this time the victory is already deserved, because in Mini you can not add a faster network card.
8.7 MPlayer
Tested with Serenity-HDDVDTrailer.mp4, HD resolution 1280x720, H.264 codec.
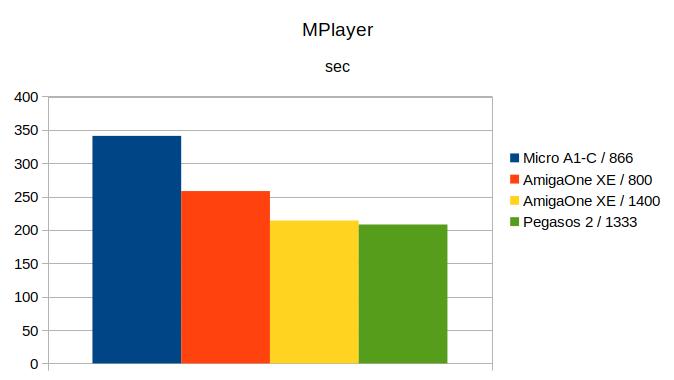
An illustrative example of how AltiVec is suitable for these tasks. And overclocking XE has also been beneficial. Well, anyway, we can only watch HD movies with H.264 codec on XE in a pinch. You already need to turn on framedrops and the picture is jerky at times.
8.8 Cow3D
Warp3D test.
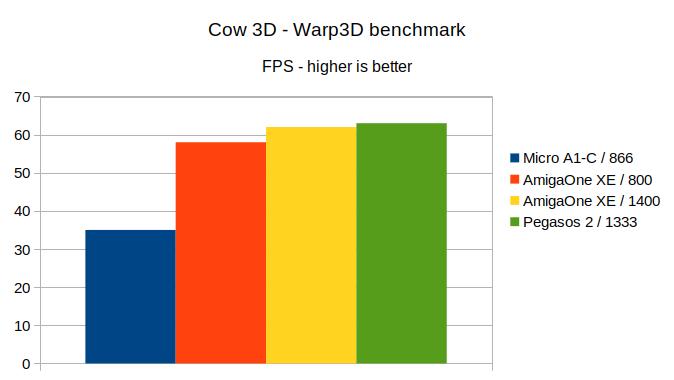
Overclocking helped us, but not as much as expected. Apparently we have already hit the bus limitations in XE. However, we're practically at Pegasos 2 level. And the Micro with the outdated graphics card is not keeping up.
8.9 HTML gfx benchmark
Tested using wirple.com/bmark, this is a graphics test and the figure shows the FPS at the start of the test.
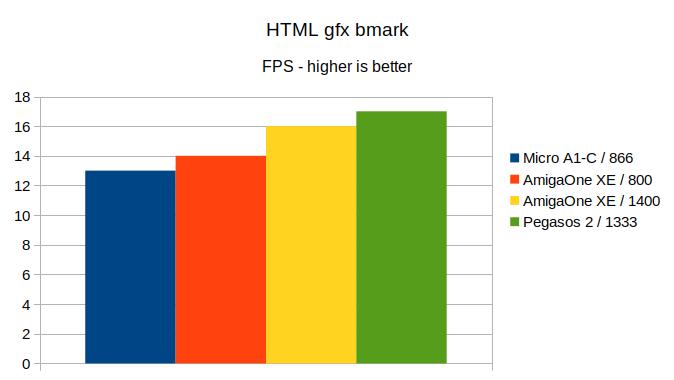
Overclocking pays off here too. And what we won't see in this chart, overclocking pays off, especially because of the large amount of javascript in modern websites.
8.10 SDLBench
The performance of the Micro A1-C is taken as a basis.
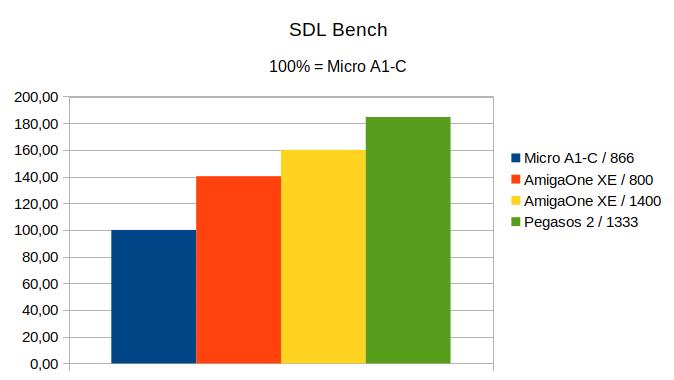
Actually, we don't see anything unexpected here. The overclocking boosted the performance of SDL XE by 15%.
8.11 Blender
Tested with test.blend.
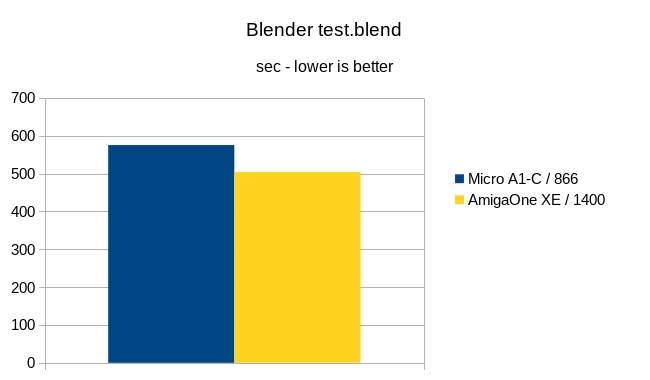
Here unfortunately I don't have data from the unoverclocked XE or from the Pegasos 2 with AmigaOS ( I don't want to change the graphics card from Radeon 9800 PRO to 9000 PRO again ), so the graph is not very eloquent.
But Blender doesn't use AltiVec, so we can get an idea of the speed at least from Micro.
8.12 FPS games
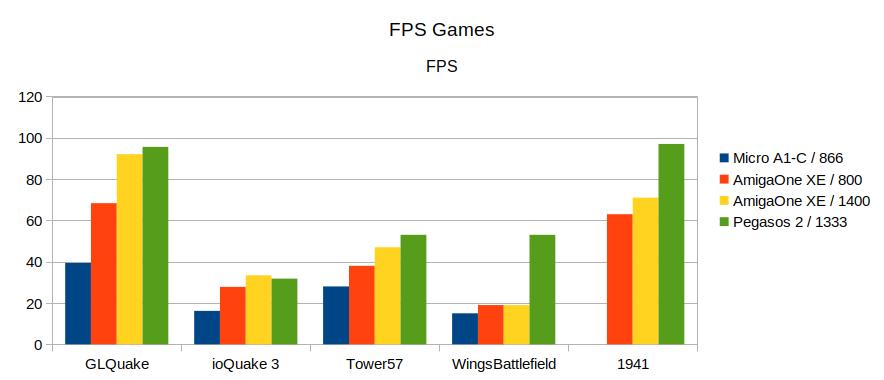
Except for WingsBattlefield overclocking has helped everywhere.
ioQuake 3 is faster on XE than on Pegasos 2. And the Tower57 game is the next and last case where the XE outperforms my overclocked Mac Mini. By 1 FPS.
We already know that the Micro is not suitable for games, but the chart also shows that you don't need to overclock the XE for these games, the XE is sufficient for them even with an 800 MHz CPU.
8.13 Emulators
E-UAE
Tested with JiT SDL versions, installed Picasso96 with uaegfx. I tested SysInfo and ADoom.
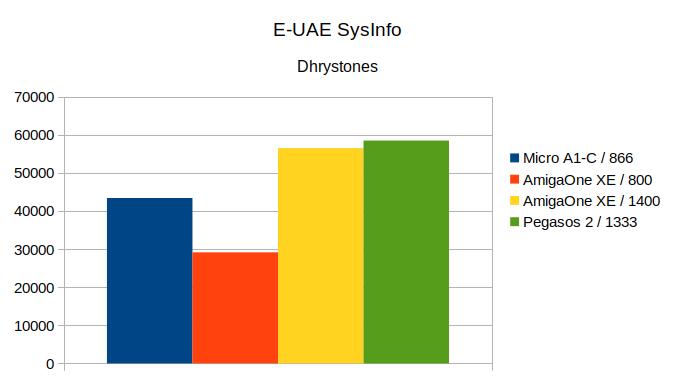
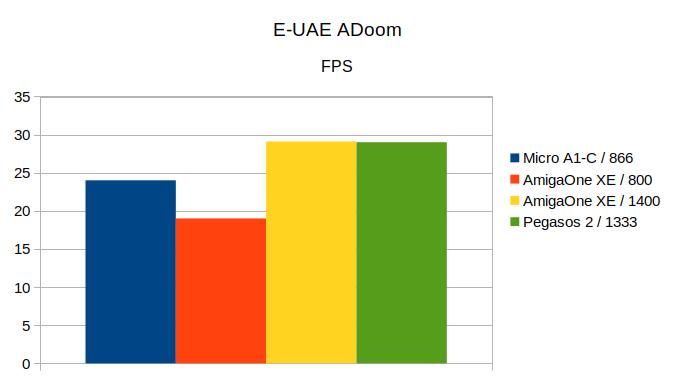
So here the performance increase is really significant. Overclocking will provide great comfort in playing classic AmigaOS games, the same as on Pegasos 2.
DOSBox
Tested with JiT versions. For testing I used SpeedTest ( shows a multiple of the original PC / XT speed ) and Quake.
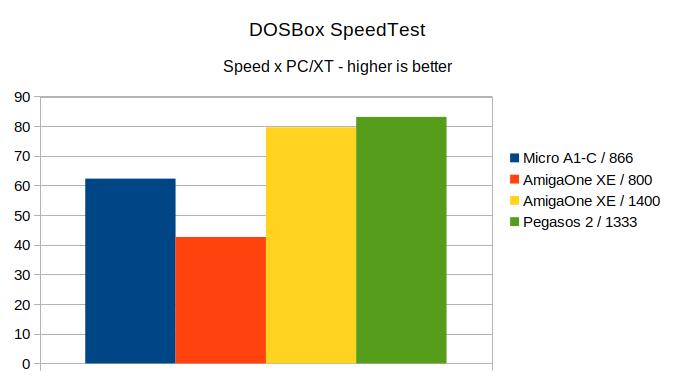
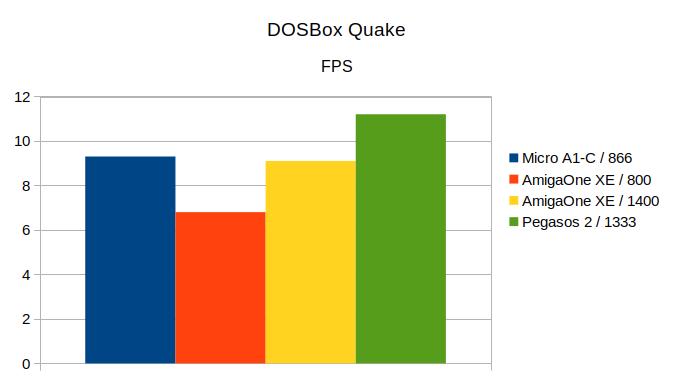
Again, overclocking is very suitable for DOSBox. Even if we've only touched the Micro performance in Quake, that's fine. And Pegasos is a bit faster here.
I'm actually quite curious why Micro scores so high in this test. It has a worse graphics card, performance in SDL, and lower CPU frequency. The only thing I can think of where the Micro is better is that its CPU has twice the L2 cache - 512 kB versus 256 kB for the XE. Or am I measuring something wrong?
9. Conclusion
While the AmigaOne XE / 1.4 GHz is faster than the Mac Mini / 1.83 GHz in a few isolated cases, it still remains below the performance of the Pegasos 2 / 1.33 MHz overall. But it comes close to touching it. Why we're not faster with a faster CPU overall as well is due to two facts:
- The AmigaOne XE uses the 60x protocol on the system bus between the CPU and the Northbridge, whereas the Pegasos 2 uses the more modern and faster MPX. Even though MPX is actually only a little faster ( one dead cycle when transferring a block ), this is the bottleneck, so even that little will show.
- The AmigaOne XE's Northbridge Articia-S has a significantly worse PCI controller design than the Marwell Discovery II in the Pegasos 2. While the Discovery II has two separate Host bridges ( the starting point of the PCI controller ), one for the graphics card and one for the other PCI cards, the Articia-S has only one Host bridge on the PCI 33 MHz bus and the AGP bus is connected to it via a bridge, so all traffic from the AGP bus must pass through this bottleneck.
The overclocking results indicate that we have already hit the limits of the PCI and AGP buses of the AmigaOne XE, so further increases in CPU speed would only be slightly and only somewhere.
Although replacing the CPU is a risky step, I think the results justify the risk. The AmigaOne XE at the original 800 MHz may be fine for playing older AmigaOS games, but at 1400 MHz it is already suitable for regular internet, emulators and utility programs. Thus modified, and I would say even pampered, the AmigaOne XE is, along with the Pegasos 2, the best AmigaNG of the first generation. It will leave behind not only Micro and Sam440ep, but also Sam440ep-flex and Sam460ex ( although the latter two have the advantage of being able to use Enhancer and Warp3DNova ). In short, we will make the toy a general purpose computer in 2023.
Finally, a word of caution: not everyone can do CPU swapping and reballing, it's really top level. If you've never done it or don't have the proper equipment, don't even attempt it. Trust it to an experienced person who knows how to do it. Every CPU module that goes bad would be a shame. And I prefer not to even get into things like soldering resistors and jumpers myself.
And at the very end, a special thanks to those without whom it would not have been possible:
Megafix: for really doing what they promise, this is not commonplace nowadays,
Sven Grosse: for the wiring diagram of PLL_CFG 4,
work colleague: for soldering the same.
Images used:
CPU - en.wikipedia.org
VCore 1.6V Powermac setup diagram - thehouseofmoth.com
